Skip to content

AI Object Detection — Passthrough
AI Agent

Download Latest Version

Overview

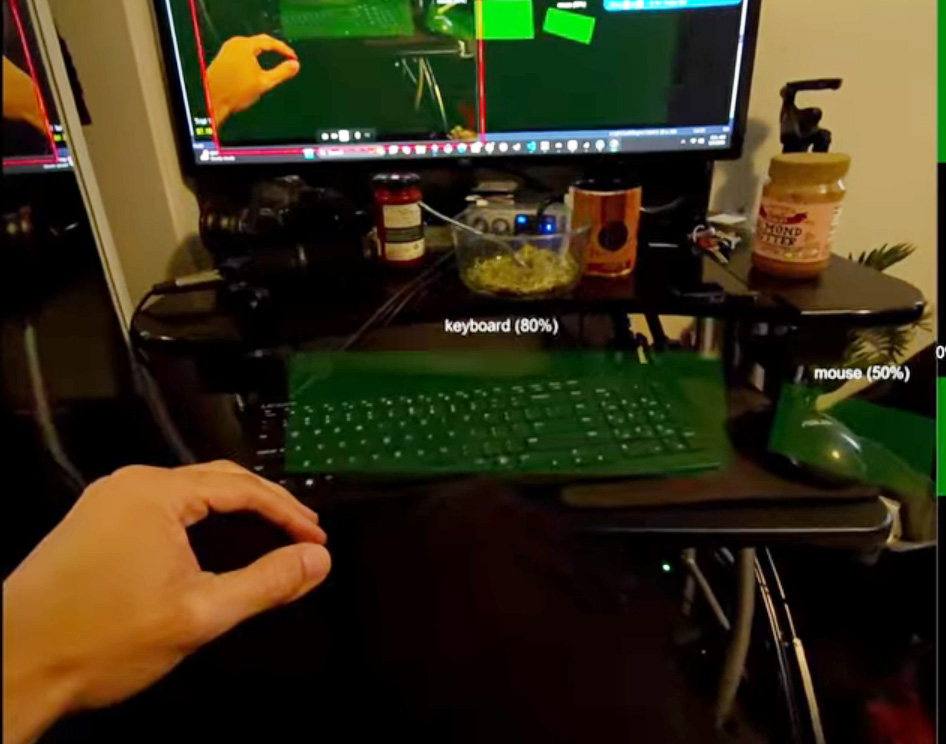
AI Object Detection brings automatic object identification to XR/AR studies by combining real-time YOLOv8 object detection with SightLab gaze/head tracking data collection. During a session, the participant wears a passthrough-enabled headset and the headset viewpoint is cast to a desktop window. For example, Meta Quest Developer Hub casting can show the Quest passthrough view in a window on the PC. This script captures that cast/mirror window, runs YOLO on each captured frame, and creates invisible 3D collision volumes at the approximate positions of detected objects. These volumes are registered as SightLab sceneObjects with gaze=True, so dwell time, view count, and other attention metrics are collected automatically per object — no manual scene object setup required.

The key requirement is that YOLO sees the same passthrough viewpoint the participant sees. The normal SightLab desktop mirror may not include the headset passthrough camera feed, so use an external cast or mirror source that does include passthrough, such as Meta Quest Developer Hub casting, Oculus Mirror, or a SteamVR mirror window when appropriate.

With an eye-tracked headset, SightLab records gaze-based object attention. With a headset that does not provide eye tracking, such as Meta Quest 3, the same workflow can still run, but object attention is based on the headset/view direction rather than true eye gaze.

This allows researchers to run mixed-reality studies where participants look around a real passthrough scene and the system automatically records which detected objects they looked toward, for how long, and how many times — all without having to pre-label every object in the scene.

You can also train the YOLO model on your own images and content. See this page for more information on this, or use the included Train_YOLO.py helper script as described in the Training a Custom YOLO Model section below.

Desktop testing: You can also test the detection pipeline by selecting any visible desktop window as the capture source. This is useful for validating YOLO settings, but it does not replace headset passthrough casting for a real mixed-reality run.


Architecture

Passthrough-enabled headset shows real-world view
        |
        v
External cast/mirror window on the PC
  e.g. Meta Quest Developer Hub cast
        |
        v
WindowCapture (finds window by title from config)
        |
        v
grab_yolo_frame()  -- Win32 PrintWindow -> numpy RGB array
        |
        v
YOLODetector (background thread, ultralytics YOLOv8)
        |
        v
DetectedObjectManager
   - Creates vizshape.addBox() collision volumes
   - Registers each as sightlab.addSceneObject(key, node, gaze=True)
   - Matches detections across frames to maintain persistent keys
   - Removes stale objects after OBJECT_PERSISTENCE_TIME
        |
        v
SightLab collects gaze/dwell data on each tracked object
        - Eye-tracked headset: eye gaze drives object hits
        - Non-eye-tracked headset: headset/view direction drives object hits

Requirements

Software

Requirement Notes
Vizard 8 WorldViz Vizard with Python 3.x
SightLab sightlab_utils must be on the Python path
ultralytics YOLOv8 — pip install ultralytics
opencv-python Image processing — pip install opencv-python
numpy Array handling — pip install numpy
pywin32 Window capture — pip install pywin32

Hardware / Capture Source

Requirement Notes
Passthrough-enabled headset Required for mixed-reality object detection. Examples include Meta Quest Pro, Meta Quest 3, and other OpenXR passthrough-capable headsets
Desktop cast/mirror window Required capture source for YOLO. Use a window that shows the headset passthrough viewpoint, such as Meta Quest Developer Hub casting
Eye tracking Optional. Eye-tracked headsets produce gaze-based metrics; non-eye-tracked headsets use headset/view direction instead

Installing Dependencies in Vizard

Use Vizard's built-in Package Manager (Tools → Package Manager) or run pip directly from Vizard's Python:

"C:\Program Files\WorldViz\Vizard8\bin\python.exe" -m pip install ultralytics opencv-python numpy pywin32

Note: The first time ultralytics runs, it will download the YOLOv8 model file (~6 MB for yolov8n.pt). This requires an internet connection.


Files

File Purpose
AI_ObjectDetection_MR_Config.py All tunable settings (passthrough, model, thresholds, visuals, capture)
AI_ObjectDetection_MR.py Main script — run this in Vizard

How to Run

  1. Start headset passthrough and cast the headset view to the PC.
  2. For Quest headsets, Meta Quest Developer Hub casting is the recommended option because it can show the passthrough viewpoint that YOLO needs to analyze.
  3. Keep the cast/mirror window visible and unobstructed on the desktop.
  4. Open AI_ObjectDetection_MR_Config.py and verify settings (model, confidence, overlays, capture, etc.).
  5. CAPTURE_WINDOW_TITLE = None opens a window picker at startup. Select the cast/mirror window that shows the headset passthrough view.
  6. To skip the picker, set CAPTURE_WINDOW_TITLE to a unique part of the cast window title.
  7. Open AI_ObjectDetection_MR.py in Vizard and press F5 (or use the "Run WinViz on Current File" task).
  8. Press Spacebar to start the trial — YOLO detection begins on the captured cast window.
  9. The participant looks around the passthrough scene; detected objects appear as semi-transparent boxes with labels.
  10. Can press the i key to toggle the participant seeing the debug boxes, or can set this to never show the boxes to the participant by setting SHOW_OVERLAYS_IN_HMD = False. This will then only show the debug boxes on the mirrored view.
  11. Press Spacebar again to end the trial.
  12. SightLab saves per-object attention data (dwell time, view count, etc.) to the data/ folder.

Runtime Keyboard Controls

Key Action
Space Start / stop trial
d Toggle debug bounding boxes on/off
i Toggle YOLO overlays in HMD (keeps them on desktop mirror for researcher)
o Toggle origin marker
r Reset viewpoint position
p Toggle detection picture-in-picture window

Configuration Reference (AI_ObjectDetection_MR_Config.py)

YOLO Detection

Setting Default Description
YOLO_MODEL 'yolov8n.pt' Model size. Options: yolov8n.pt (nano, fastest), yolov8s.pt (small), yolov8m.pt (medium, most accurate)
YOLO_CONFIDENCE 0.5 Minimum confidence threshold (0.0–1.0). Lower = more detections but more false positives
DETECTION_INTERVAL 0.3 Seconds between YOLO inference runs. Lower = more responsive, higher = less CPU
YOLO_CLASSES None COCO class IDs to detect. None = all classes. Example: [56, 62, 63] for chair, tv, laptop
MAX_TRACKED_OBJECTS 10 Maximum simultaneous tracked objects

3D Mapping

Setting Default Description
DEFAULT_OBJECT_DEPTH 1.5 Distance (meters) in front of the headset/view where collision volumes are placed. This is an approximation because the cast window provides 2D video, not real object depth
COLLISION_BOX_SIZE [0.15, 0.15, 0.15] Width, height, depth (meters) of each collision volume. Thicker depth = easier gaze/head-ray intersection
OBJECT_PERSISTENCE_TIME 5.0 Seconds an object survives after YOLO stops detecting it. Must be > SightLab's dwell threshold (500ms) or dwell data won't accumulate
MATCHING_DISTANCE_THRESHOLD 0.5 Max normalised screen-space distance to match a new detection to an existing tracked object of the same class. Higher = more forgiving when the user moves

Visualization

Setting Default Description
SHOW_DEBUG_BOXES True Show green semi-transparent bounding boxes over detected objects
DEBUG_BOX_ALPHA 0.3 Opacity of debug boxes (0.0–1.0)
SHOW_LABELS True Show 3D text labels (class name + confidence) above each object
SHOW_OVERLAYS_IN_HMD True Whether overlays render in the HMD at startup. Toggle with i key at runtime. When off, overlays still appear on the desktop mirror
SHOW_DETECTION_PIP False Show the YOLO annotated feed in a small picture-in-picture window in the HMD

Gaze Tracking

Setting Default Description
ENABLE_GAZE_TRACKING True Register detected objects as SightLab gaze targets
USE_GAZE_BASED_ID True Print console messages and show labels when the active SightLab gaze/head ray dwells on an object

Eye tracking note: On headsets with eye tracking, dwell metrics reflect eye gaze. On headsets without eye tracking, such as Meta Quest 3, SightLab can still use the headset/view direction, so the data should be interpreted as head-directed attention rather than eye gaze.

Window Capture

Setting Default Description
CAPTURE_WINDOW_TITLE None Window title to capture. For mixed reality, this should be the external cast/mirror window showing headset passthrough, not the normal Vizard desktop mirror. None prompts with a window picker at startup
CAPTURE_FLIP None Flip captured frame: 0 = vertical, 1 = horizontal, -1 = both, None = no flip

Other

Setting Default Description
SCREEN_RECORD_WINDOW False Enable recording of the desktop/capture window when supported by the SightLab setup
PASSTHROUGH_ON True Enable SightLab passthrough setup for supported headset configurations
INSTRUCTION_MESSAGE (see config) Text shown at trial start

Common COCO Class IDs

For use with YOLO_CLASSES. Limiting classes can improve speed and reduce false positives when the study only cares about specific object types:

ID Class ID Class ID Class
0 person 56 chair 66 keyboard
39 bottle 57 couch 67 cell phone
41 cup 58 potted plant 73 book
46 banana 59 bed 74 clock
47 apple 60 dining table 75 vase
49 orange 62 tv/monitor 76 scissors
51 carrot 63 laptop 77 teddy bear
55 cake 64 mouse

Full list: COCO dataset classes

AI Agent


How Dwell Time Collection Works

SightLab tracks the active gaze/head ray on registered scene objects automatically. For dwell data to accumulate on a YOLO-detected object:

  1. The object must persist with the same key across multiple frames (e.g. yolo_chair_3 stays yolo_chair_3)
  2. The object must survive long enough for the user's gaze/head ray to exceed SightLab's dwell threshold (default 500ms)
  3. The collision box must be thick enough for the gaze/head ray to intersect it

If objects are being removed and recreated too quickly (new keys each time), dwell time resets to zero. This is controlled by:

  • OBJECT_PERSISTENCE_TIME — how long an object survives after YOLO stops detecting it (default: 5s)
  • MATCHING_DISTANCE_THRESHOLD — how aggressively detections are matched to existing tracked objects (default: 0.5)
  • COLLISION_BOX_SIZE depth — thicker boxes are easier to hit with gaze/head rays (default: 0.15m)

Output Data

SightLab saves standard experiment data to the data/ folder, including per-object:

  • Dwell time — total time gaze/head direction rested on each detected object
  • View count — number of times gaze/head direction entered each object
  • Average dwell time — mean gaze duration per view
  • First view time — when the user first looked at each object
  • Gaze/head timeline — temporal sequence of object attention events

Each YOLO-detected object appears in the data with its key (e.g. yolo_chair_3, yolo_laptop_7). When using a headset without eye tracking, label exported metrics and study notes accordingly so they are not interpreted as eye-gaze measurements.


Training a Custom YOLO Model

The default yolov8n.pt model recognises the 80 COCO classes. If your study involves objects that are not in that list — custom products, lab equipment, signage, branded items, etc. — you can fine-tune YOLO on your own images and then point the detection pipeline at the new weights.

A Train_YOLO.py helper script is included in the AI Object Detection demo folder to scaffold the dataset, run training, and sanity-check the result.

How YOLO training works

YOLO learns to draw bounding boxes from pairs of:

  1. Images (.jpg / .png)
  2. Label files — one .txt per image with the same basename. Each line is one object:
    <class_id> <x_center> <y_center> <width> <height>
    

    All four coordinates are normalised to 0–1 (fraction of image size). For example, a single object filling the centre half of the image:
    0 0.5 0.5 0.5 0.5
    
  3. A data.yaml file telling YOLO where the images live and what your class names are.

You start from a pretrained checkpoint (e.g. yolov8n.pt), fine-tune on your dataset, and YOLO writes a new best.pt to runs/detect/<name>/weights/. That file is what you load in AI_ObjectDetection_MR_Config.py.

Step-by-step quick start

1. Install ultralytics in Vizard's Python

"C:\Program Files\WorldViz\Vizard8\bin\python.exe" -m pip install ultralytics

2. Gather images

  • Aim for 20–50 images per class as a minimum to get a usable model. More is better — a few hundred per class is a good target for production-quality results.
  • Use the same kind of viewpoint and lighting your participants will see. If the study is run in passthrough on a Quest, capture training images from the cast window or with a similar camera.
  • Vary angles, distances, lighting, and backgrounds so the model does not overfit to a single setup.

3. Label the images

Use any of these tools and export in YOLO format:

  • LabelImg — simple, free, runs locally
  • Label Studio — free, web-based, supports teams
  • Roboflow — web-based, also handles dataset hosting and augmentation
  • CVAT — open-source, web-based

Each tool produces one .txt per image with the YOLO label format described above.

4. Scaffold the dataset folder

From the demo folder, run:

python Train_YOLO.py --init my_class1 my_class2

This creates the expected layout and a starter data.yaml:

training_dataset/
    data.yaml
    images/
        train/    # ~80–90% of your images
        val/      # ~10–20% of your images, for validation
    labels/
        train/    # matching .txt files
        val/      # matching .txt files

5. Split your data

Copy the bulk of your images into images/train/ and a smaller, representative subset (typically 10–20%, e.g. 5–10 images out of 50) into images/val/. Make sure the matching .txt label files go into labels/train/ and labels/val/. The validation set should not overlap with training images.

6. Train

python Train_YOLO.py --train --epochs 100 --name my_run

Useful options:

Option Default Notes
--epochs 50 Number of passes over the dataset. 50–100 is a reasonable starting range for small datasets
--imgsz 640 Training image size
--batch 16 Batch size; use -1 to auto-fit GPU memory
--device auto cpu, 0 (first GPU), cuda, mps
--model yolov8n.pt Starting checkpoint. Use yolov8s.pt / yolov8m.pt for higher accuracy at higher cost
--name custom Output run name → runs/detect/<name>/

Training writes the best weights to runs/detect/<name>/weights/best.pt, plus loss/metric plots and example predictions in the same folder.

7. Sanity-check the trained model

python Train_YOLO.py --predict path\to\test_image.jpg --name my_run

This runs inference using the new weights and saves an annotated copy of the image to runs/detect/<name>_predict/. Open it to confirm the boxes look right.

8. Use the new weights in the detection demo

Edit AI_ObjectDetection_MR_Config.py:

YOLO_MODEL = r"runs/detect/my_run/weights/best.pt"
YOLO_CLASSES = None   # or [0, 1, ...] to filter by your custom class IDs

The class IDs in YOLO_CLASSES correspond to the order in your data.yaml names: block (your first class is 0, second is 1, etc.).

Tips

  • Start small. Train one short run (e.g. --epochs 30) on a handful of images to confirm the labels are correct before committing to a full run.
  • Image size matters. --imgsz 640 is the default. Larger sizes can help with small objects but slow down training and inference.
  • GPU strongly recommended. Training on CPU works but is slow. A consumer NVIDIA GPU shortens training from hours to minutes for small datasets.
  • Watch the validation loss. If validation loss rises while training loss falls, the model is overfitting — gather more images or stop earlier (the included script uses --patience 20 for early stopping by default).
  • Re-use COCO classes when you can. If your study only needs common objects (chair, cup, laptop, etc.), the stock yolov8n.pt is usually good enough — no training required.

For full reference of all training arguments, see the Ultralytics training docs.


Troubleshooting

Issue Solution
No detections appearing Check that the selected capture window is the headset cast/mirror window and that it visibly contains the passthrough feed. Try CAPTURE_WINDOW_TITLE = None to use the window picker
Capture shows Vizard content but not passthrough Use an external cast/mirror source such as Meta Quest Developer Hub casting. The normal Vizard desktop mirror may not include the headset passthrough camera feed
Detections flicker / constantly reset Increase OBJECT_PERSISTENCE_TIME and MATCHING_DISTANCE_THRESHOLD
Dwell time only recorded on one object Same as above — objects are being recycled before dwell accumulates
DeleteDC failed error The script already calls screen_capture.stop_capture() to prevent this. If it still occurs, ensure only one capture source is active
ultralytics not installed warning Install with: pip install ultralytics using Vizard's Python
Vizard autocomplete spamming errors The script uses __import__() for third-party packages to avoid this. If it persists, ensure no standard import ultralytics lines exist
Boxes appear but no gaze/head data Verify ENABLE_GAZE_TRACKING = True and that the collision box depth is sufficient (>= 0.1m)
Quest 3 data is not true eye tracking Expected. Quest 3 does not provide eye tracking, so object attention is based on headset/view direction
Low frame rate Increase DETECTION_INTERVAL, use yolov8n.pt (nano model), or reduce MAX_TRACKED_OBJECTS