External Data Recorder - Steam Link
This guide covers using the External Data Recorder with headsets connected to the PC over Steam Link, Valve's app for streaming SteamVR to a headset. Applications run through SteamVR, and you record SteamVR's VR View window, the same as with Vive headsets. Please read the External Data Recorder - Overview first to complete setup and learn how the recorder works.
Compatible Headsets
| Headset | Hardware configuration | Gaze point | Calibration |
|---|---|---|---|
| Meta Quest Pro | Steamlink | Headset eye tracking over Steam Link | Yes |
| Vive Focus Vision | Steamlink | Headset eye tracking over Steam Link | Yes |
| Steam Frame | Steamlink | Headset eye tracking over Steam Link | Yes |
| Pico 4 Pro and Pico 4 Enterprise (untested) | Steamlink | Headset eye tracking over Steam Link, if available | Yes |
| Meta Quest 3 and 3S | Meta Quest 3 Recorder | Center of the headset view | No |
Pico 4 Pro and Pico 4 Enterprise: eye tracking over Steam Link is unconfirmed. Run Steamlink_Gaze.py to check whether gaze arrives (see Setup).
For Meta Quest headsets, Steam Link is an alternative to Meta Horizon Link. You don't need the Meta Horizon Link app on the PC, so you avoid the issues with Horizon Link versions later than 207. For the Vive Focus Vision, Steam Link is an alternative to the setup in the Vive guide.
How Eye Tracking Works
SteamVR's Steam Link driver can share the headset's eye tracking with other programs on the PC as OSC (Open Sound Control) messages. The recorder listens for them on the UDP port set by STEAMLINK_OSC_PORT in Data_Recorder_Config.py (9000 by default). Calibration and recording read gaze from it, and recording also saves eye openness from it. Because the recorder doesn't open its own OpenXR session, the external application keeps the headset to itself.
Which port you use decides how eye openness is recorded:
| Port | Gaze | Eye openness | Also turn on in SteamVR |
|---|---|---|---|
| 9000 (default) | Yes | One value for both eyes | Nothing else |
| 9015 | Yes | A separate value for each eye | Share face tracking data to other apps on this PC |
See Per-Eye Openness on the Meta Quest Pro to switch to 9015.
Only one program can listen on the port at a time. Close VRChat (which uses port 9000) and VRCFaceTracking (which uses port 9015) before you start.
Setup
- Install Steam and SteamVR on the PC.
- On Meta Quest, Vive Focus Vision, and Pico headsets, install the Steam Link app. On the Vive Focus Vision, it's in the VIVE Store.
- Connect the PC and the headset to the same network.
- On headsets with eye tracking, turn on eye tracking in the headset's settings. On the Meta Quest Pro, also calibrate it there.
- Connect the headset to the PC with Steam Link. On Meta Quest, Vive Focus Vision, and Pico headsets, launch the Steam Link app and choose your PC.
- On the PC, open SteamVR's settings, and at the bottom left, set Advanced Settings to Show.
-
In the OpenXR tab, make sure Current OpenXR Runtime is SteamVR, and set Meta Plugin Compatibility to On. OpenXR applications need to run on SteamVR to appear in the headset and the
VR Viewwindow, and Meta Plugin Compatibility lets applications built with Meta's OpenXR plugin run on SteamVR.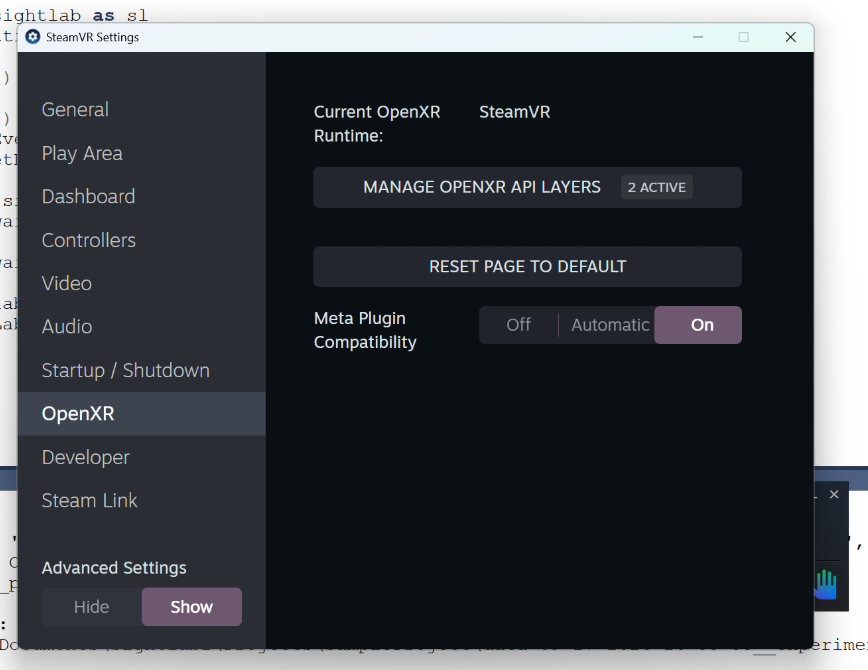
-
For headsets with eye tracking, in the Steam Link tab, turn on Enable OSC and Share eye tracking data to other apps on this PC. The recorder needs both, because eye tracking data reaches it as OSC messages. Also make sure the tab's OSC Output Port matches
STEAMLINK_OSC_PORTinData_Recorder_Config.py. The default, 9000, works as is, and records one eye openness value for both eyes.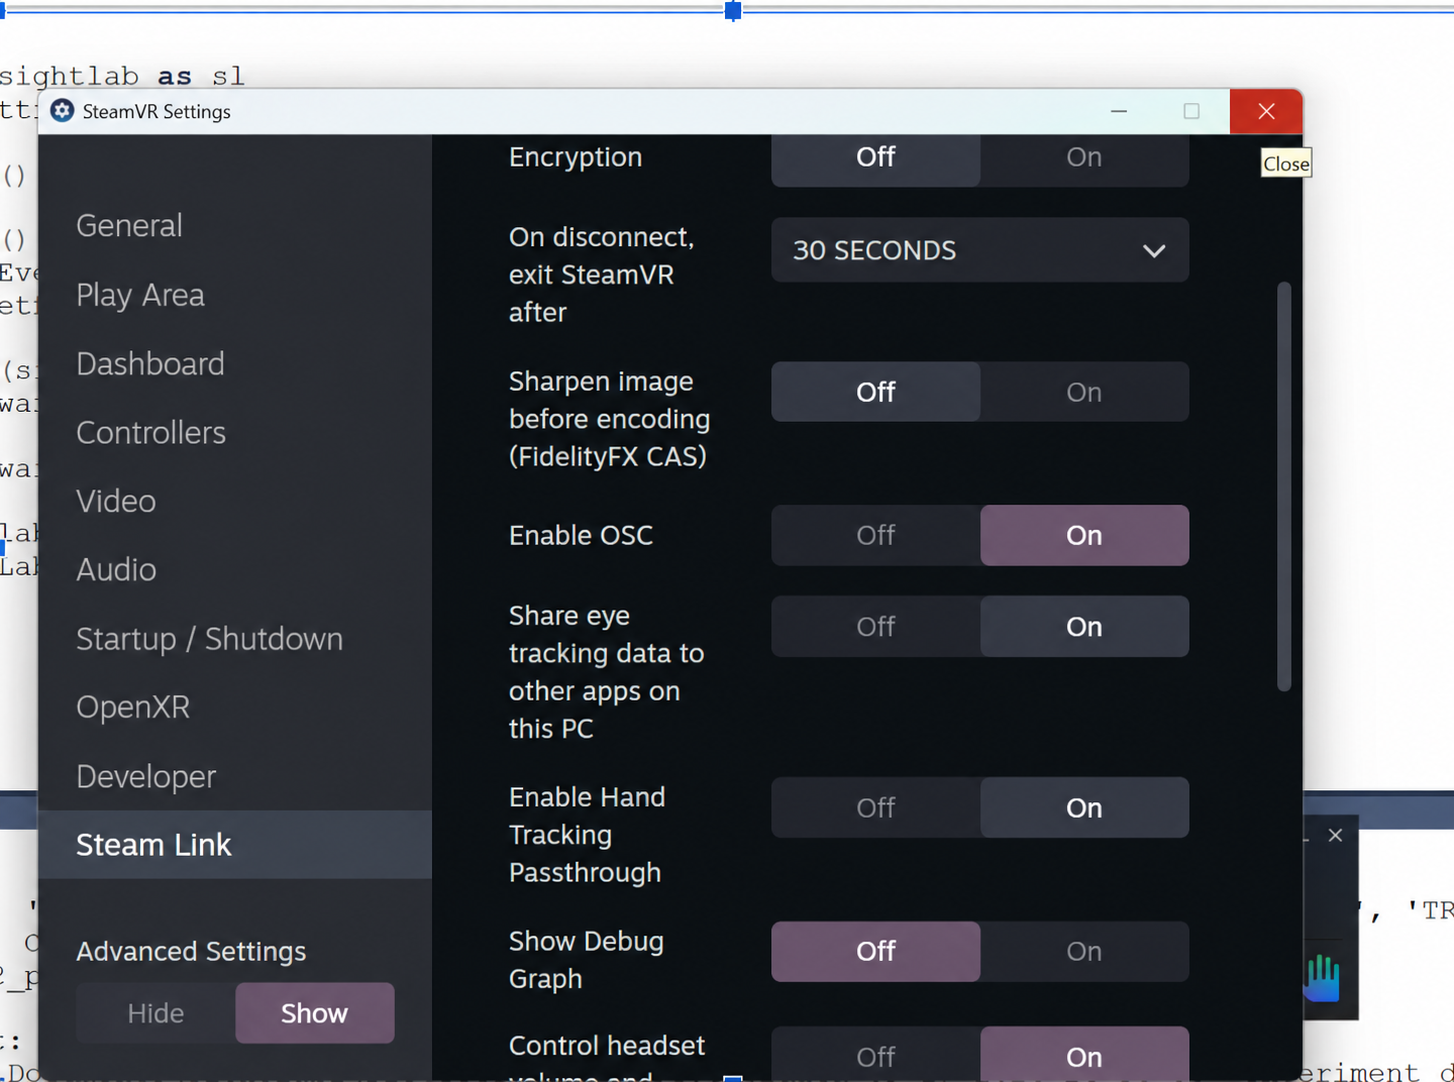
-
Right-click the SteamVR Status window and choose Display VR View. Make the
VR Viewwindow full screen, and in its menu, choose Both Eyes - Right Dominant: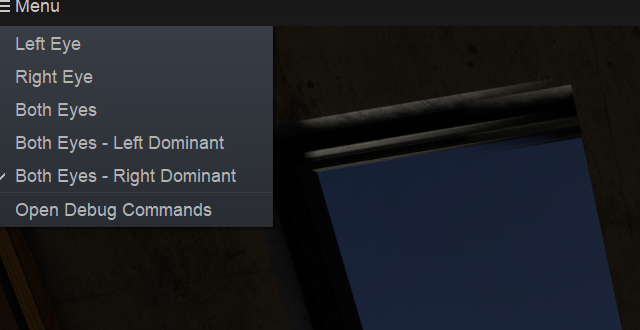
Check that gaze and eye openness are arriving: for headsets with eye tracking, run Steamlink_Gaze.py from the External Data Recorder folder on its own, with the headset on. It prints your gaze direction as you look around, and every OSC message it receives. Looking straight ahead should read close to dir=(0, 0, 1), looking right should make x positive, and looking up should make y positive.
It also prints eye openness as open L/R= followed by the left and right values and where they came from. Blink to check that the values drop toward 0. On port 9000, /tracking/eye/EyesClosedAmount should be in the list of messages, and the source should read EyesClosedAmount shared. If openness reads None and the source reads none, no openness data is arriving, and the recording's eye openness columns will be None too.
Steamlink_Gaze.py listens on port 9000 unless you give it another port. It doesn't read Data_Recorder_Config.py, so if you changed the port, add it after the script name, for example python Steamlink_Gaze.py 9015.
Per-Eye Openness on the Meta Quest Pro
On port 9000, Steam Link sends one eye openness value for both eyes, so Eye OpenL and Eye OpenR in the trial data are always the same. Blinks are recorded, but a wink can't be told apart from both eyes half closing. To record each eye separately, switch to port 9015, which also carries the headset's face tracking data. You need to change the port in both SteamVR and the recorder's config:
- Turn on face tracking in the headset's settings, as well as eye tracking.
- In SteamVR's settings, in the Steam Link tab, set OSC Output Port to 9015 (Custom), and turn on Share face tracking data to other apps on this PC. Keep Enable OSC and Share eye tracking data to other apps on this PC on.
- In
Data_Recorder_Config.py, setSTEAMLINK_OSC_PORT = 9015. - Run
python Steamlink_Gaze.py 9015and blink one eye at a time. The source should readface weights per eye, the two values should change separately, and/sl/xrfb/facew/EyesClosedLand/sl/xrfb/facew/EyesClosedRshould be in the list of messages.
If the two ports don't match, the recorder receives no gaze at all, not just no openness, and calibration stops with a "No Steam Link gaze" message. To go back to port 9000, change both settings back.
Recording a Session
After setup, recording works the same as for other headsets. See the Quick Start for the full walkthrough.
- Start the External Data Recorder from the SightLab Dashboard (Tools/Features > External Data Recorder > Run: External Data Recorder).
- When asked for the window to record, choose
VR View. It can be covered by other windows, but it must not be minimized. -
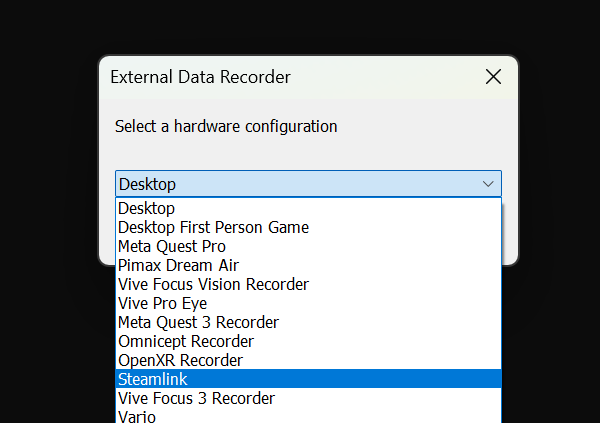
Choose the hardware configuration for your headset from the table above: Steamlink for the Meta Quest Pro, Vive Focus Vision, Steam Frame, and Pico 4 Pro or Enterprise, or Meta Quest 3 Recorder for the Meta Quest 3 and 3S.
-
With Steamlink, choose New to calibrate, then follow the dots in the headset (see the Eye Calibration Guide). If no gaze is arriving, calibration stops and asks you to check the Steam Link OSC settings, so you can fix them and retry. The Meta Quest 3 Recorder skips calibration.
- Open your external application, or reopen it if calibration closed it, and make sure it shows in the
VR Viewwindow. - Enter the recording length and the participant information, then press Spacebar to start recording.
- Wait for postprocessing to finish. With the Meta Quest 3 Recorder, you'll be asked to crop the recording and adjust the gaze point (see the Postprocessing Guide).
- Find your data in the
data,recordings, andlogsfolders (see What Gets Recorded).
To replay the session, see Session Replay.
What's Recorded Over Steam Link
- Gaze: Steam Link sends one combined gaze direction, not one per eye, so the right, left, and both eye columns in the trial data are identical. The Meta Quest 3 and 3S use the center of the headset view instead.
- Eye openness: on the Meta Quest Pro and Vive Focus Vision,
Eye OpenL,Eye OpenR, andEye OpenBothrecord how open the eyes are, from 0 (closed) to 1 (open). On port 9000 all three have the same value. On the Meta Quest Pro on port 9015, with face tracking sharing on, the left and right eyes have separate values, andEye OpenBothis their average.Eye Open Sourcesays which of the two you got on each row, and theSteamlinkcolumns hold the raw values Steam Link sent. Steam Link always reports the Steam Frame's eyes as fully open, so these columns don't apply to it. - Pupil size: not available over Steam Link.
See the Data Files Reference for every file and column.
Troubleshooting
- "No Steam Link gaze" in the console or calibration: check that Enable OSC and Share eye tracking data to other apps on this PC are on, that the OSC Output Port matches
STEAMLINK_OSC_PORT, and that eye tracking is on in the headset. Then runSteamlink_Gaze.pyto see whether anything is arriving. - "Could not listen on UDP": another program is using the port. Close VRChat, VRCFaceTracking, or any other External Data Recorder or calibration window that's still open.
- The eye openness columns are
None:Eye Open Sourcereadsnone, meaning no openness data arrived. RunSteamlink_Gaze.py(with the port, if it isn't 9000) and blink, to see whether any arrives. On port 9015, also check that face tracking is on in the headset and that Share face tracking data to other apps on this PC is on. Eye OpenLandEye OpenRare always the same: on port 9000 this is expected, andEye Open SourcereadsEyesClosedAmount shared. For separate values, see Per-Eye Openness on the Meta Quest Pro. If you're already on port 9015 and it still readsEyesClosedAmount shared, face tracking data isn't arriving: check that face tracking is on in the headset and that face tracking sharing is on in SteamVR.- "tracking LOST" in the console: the headset stopped seeing your eyes, for example because they were closed or the headset was taken off. The console says "reacquired" when gaze returns. While it's lost, the last valid gaze direction is kept.
- The application doesn't appear in the headset or
VR View: check that SteamVR is the current OpenXR runtime, and that Meta Plugin Compatibility is on.