External Data Recorder - Overview
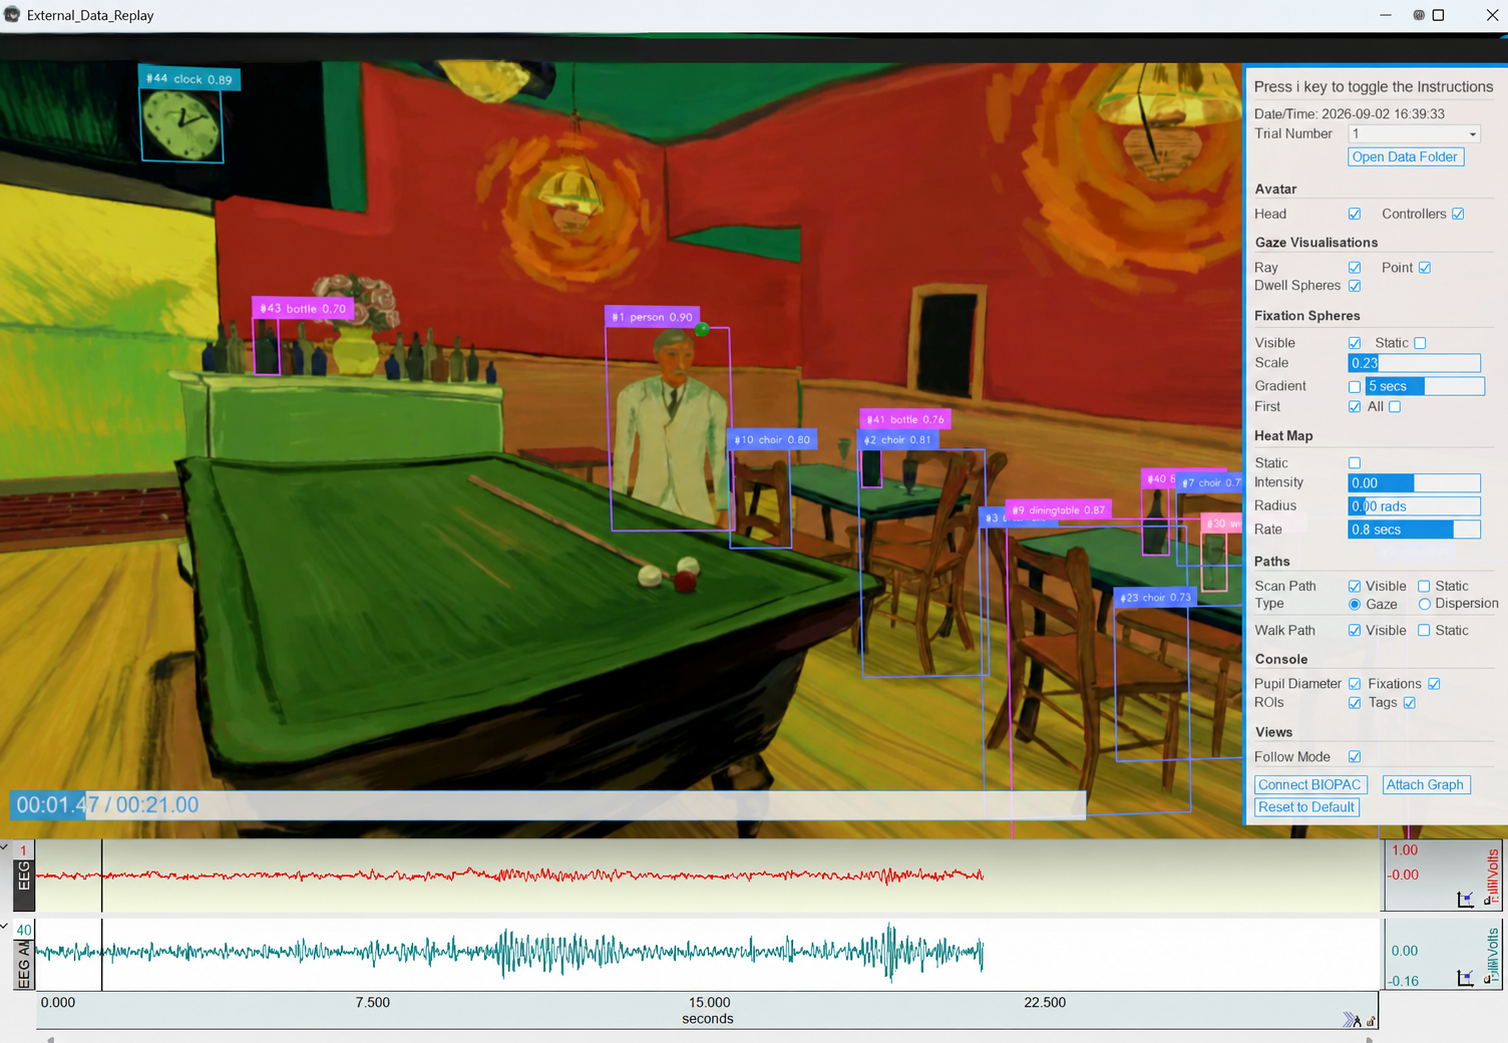
The External Data Recorder records, saves, and synchronizes eye tracking and physiological data while participants use external applications, including SteamVR games, Unity and Unreal applications, Meta apps, web-based VR, standalone headset apps, and desktop applications such as first-person games. After a session, AI object detection measures which objects participants looked at, and you can replay the recording with gaze and object overlays synchronized with the data.
What's New in 2.0
- AI based object detection: after each session, every frame of the recording is scanned for everyday objects (COCO classes), or for exactly the objects you describe with open-vocabulary detection (see AI Object Detection)
- Gaze data on objects: dwell time, fixations, and dwell counts for each detected object and class, saved to CSV files
- A real calibration stage: follow a short sequence of dots in the headset, with no need to manually line up a virtual screen (see the Eye Calibration Guide)
- Angular accuracy reported every session: a validation round measures accuracy in degrees and prompts you to recalibrate if it isn't good enough
- An audit trail of gaze quality: each participant's calibration and validation results are saved to a JSON file
- Headset slippage check: an optional validation at the end of the session measures how much accuracy drifted during the test
- Simpler, more stable recording: the video recording methods from 1.0 are replaced by OBS Studio, and the old "may crash after about 10 minutes" caveat is gone
- Cropped recordings: for setups that use the center of the view as the gaze point, crop the recording to the region you care about
- Pimax Dream Air support, with a step-by-step guide
- Reprocess old sessions: run postprocessing again on any recorded session with different detection settings (see the Postprocessing Guide)
At a Glance
- Platforms: Unreal, Unity, and SteamVR/OpenXR PC apps; desktop apps; web; standalone headset apps via casting
- Headsets with eye tracking: Vive Focus Vision (wired or over Steam Link), Vive Focus 3, Vive Pro Eye, Meta Quest Pro (over Meta Horizon Link or Steam Link), Steam Frame (over Steam Link), Pimax Dream Air, Varjo XR-3/XR-4, HP Omnicept, and generic OpenXR headsets (results may vary)
- Without eye tracking: Meta Quest 3, 3S, and 2 use the center of the headset view as the gaze point; desktop apps use the mouse or the center of the screen
- Outputs: CSV files (gaze, fixations and saccades, events, custom markers, face tracking, gaze on detected objects, and more), videos with AI object detection and gaze overlays, Biopac AcqKnowledge markers, and a replay with scan paths, fixation spheres, and heatmaps. See Common Metrics for the full list.
Setup
Installer (recommended)
The installer folder in the External Data Recorder folder contains an installer that sets everything up for you. Vizard 8 must already be installed.
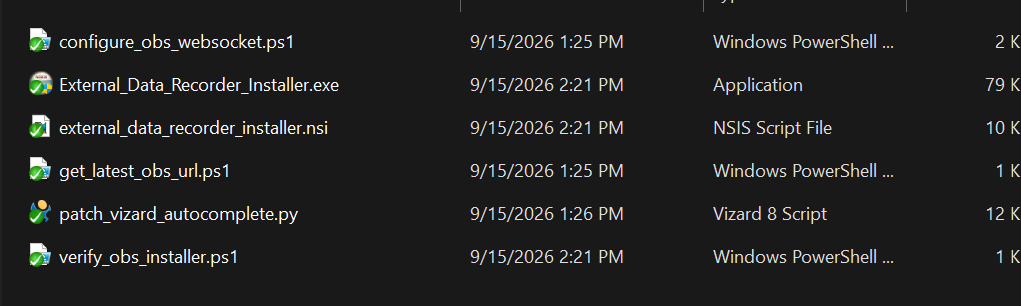
- Close OBS Studio if it's open.
- Run
External_Data_Recorder_Installer.exe, or click Run Installer on the External Data Recorder's page in the SightLab Dashboard. When Windows asks for permission, click Yes. - Choose the components to install (all are selected by default), and click Install.
The installer:
- Installs the Python packages from
requirements.txtinto Vizard 8. PyTorch is a download of several GB, so this can take a while; a console window shows the progress. - Downloads and installs the latest OBS Studio. This is skipped if OBS is already installed in its default location.
- Turns on the OBS WebSocket server on port 4455, with authentication off.
- Applies the Vizard autocomplete fix, which stops PyTorch from flooding the interactive window with errors.
If a step fails, the installer shows a message explaining how to do that step manually.
For Vive Focus Vision, Focus 3, and Pro Eye, you still need to install the SRanipal driver, which comes with Vive Console for SteamVR.
If the installer doesn't work on your system, or you'd rather set things up yourself, follow the manual steps below.
Manual Setup
Install prerequisites
- In the Vizard Package Manager (under Tools- Package Manager), open the CMD tab and install the
requirements.txtfile from the External Data Recorder folder:install -r "path\to\Sightlab2\ExampleScripts\External Data Recorder\requirements.txt"
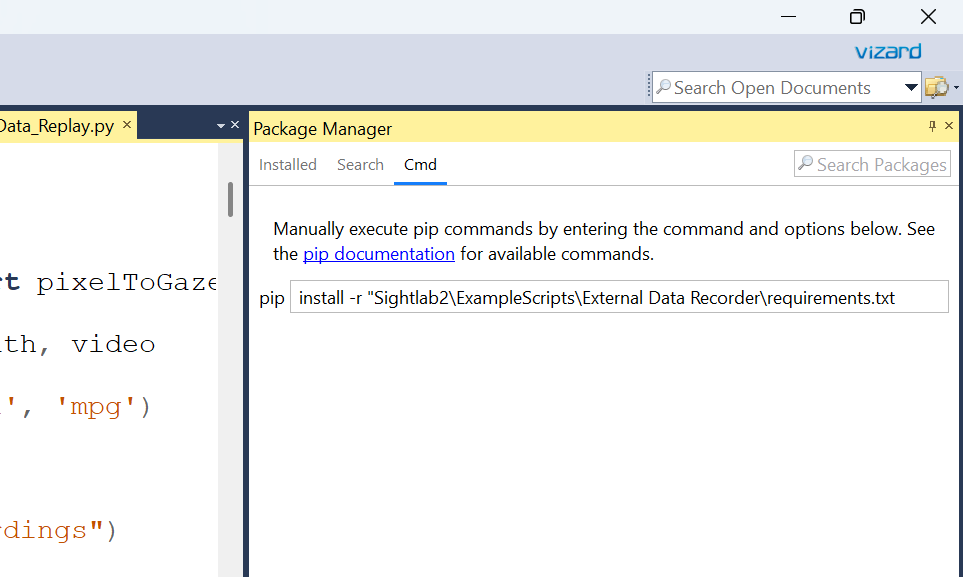
- The requirements install PyTorch built for CUDA 13.2 (tested with 2.13.0+cu132). Some graphics cards need a different PyTorch build.
- For Vive Focus Vision, Focus 3, and Pro Eye: the SRanipal driver, installed with Vive Console for SteamVR
- OBS Studio
- Note: Since installing pytorch into Vizard can cause some spamming of the interactive window you can get a patch here . Extract this and place
module_cache.pyandmodule_parser.pyinC:\Program Files\WorldViz\Vizard8\bin\ide\core\autocompletewith write permissions
OBS setup
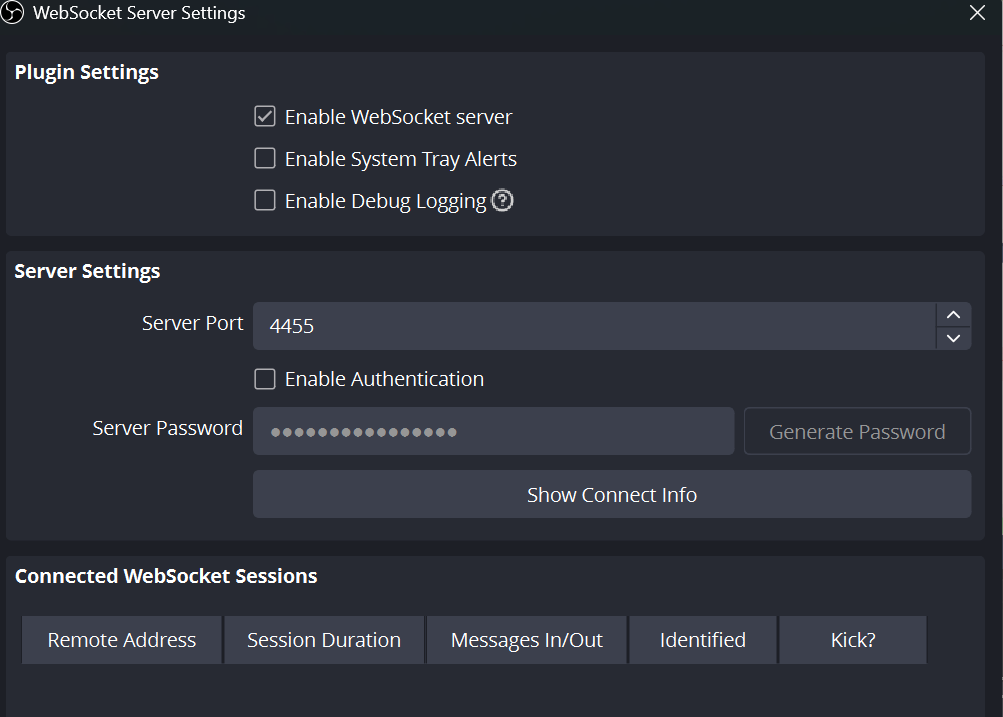
The External Data Recorder records your sessions by controlling OBS over WebSockets, so the OBS WebSocket server must be turned on:
- Open OBS. If it is your first time running OBS, keep the default settings and optimize for recording.
- In the menu bar, open Tools > WebSocket Server Settings.
- Check Enable WebSocket server.
- Uncheck Enable Authentication, and make sure Server Port is set to 4455. (Advanced users can change the script to use authentication.)
- Click OK.
If OBS isn't running when a session starts, the recorder tries to open it from its default install location. For each session, the recorder creates an OBS scene called "External Data Recorder", adds the window you chose to it, and deletes the scene when it's done, so your existing OBS scenes aren't affected. It does change the output folder for all OBS recordings, though. All OBS requests are in the record_screen_obs() function in External_Data_Recorder.py; see the OBS WebSocket protocol for what each one does.
Quick Start
This walkthrough uses a Vive Focus Vision recording an Unreal app through SteamVR's VR View. The steps are the same for other hardware; see the hardware guides for headset-specific setup.
|
1. Complete setup. Run External_Data_Recorder_Installer.exe from the installer folder (or click Run Installer in the SightLab Dashboard), or install the requirements and OBS Studio and turn on the OBS WebSocket server yourself (see Setup). |
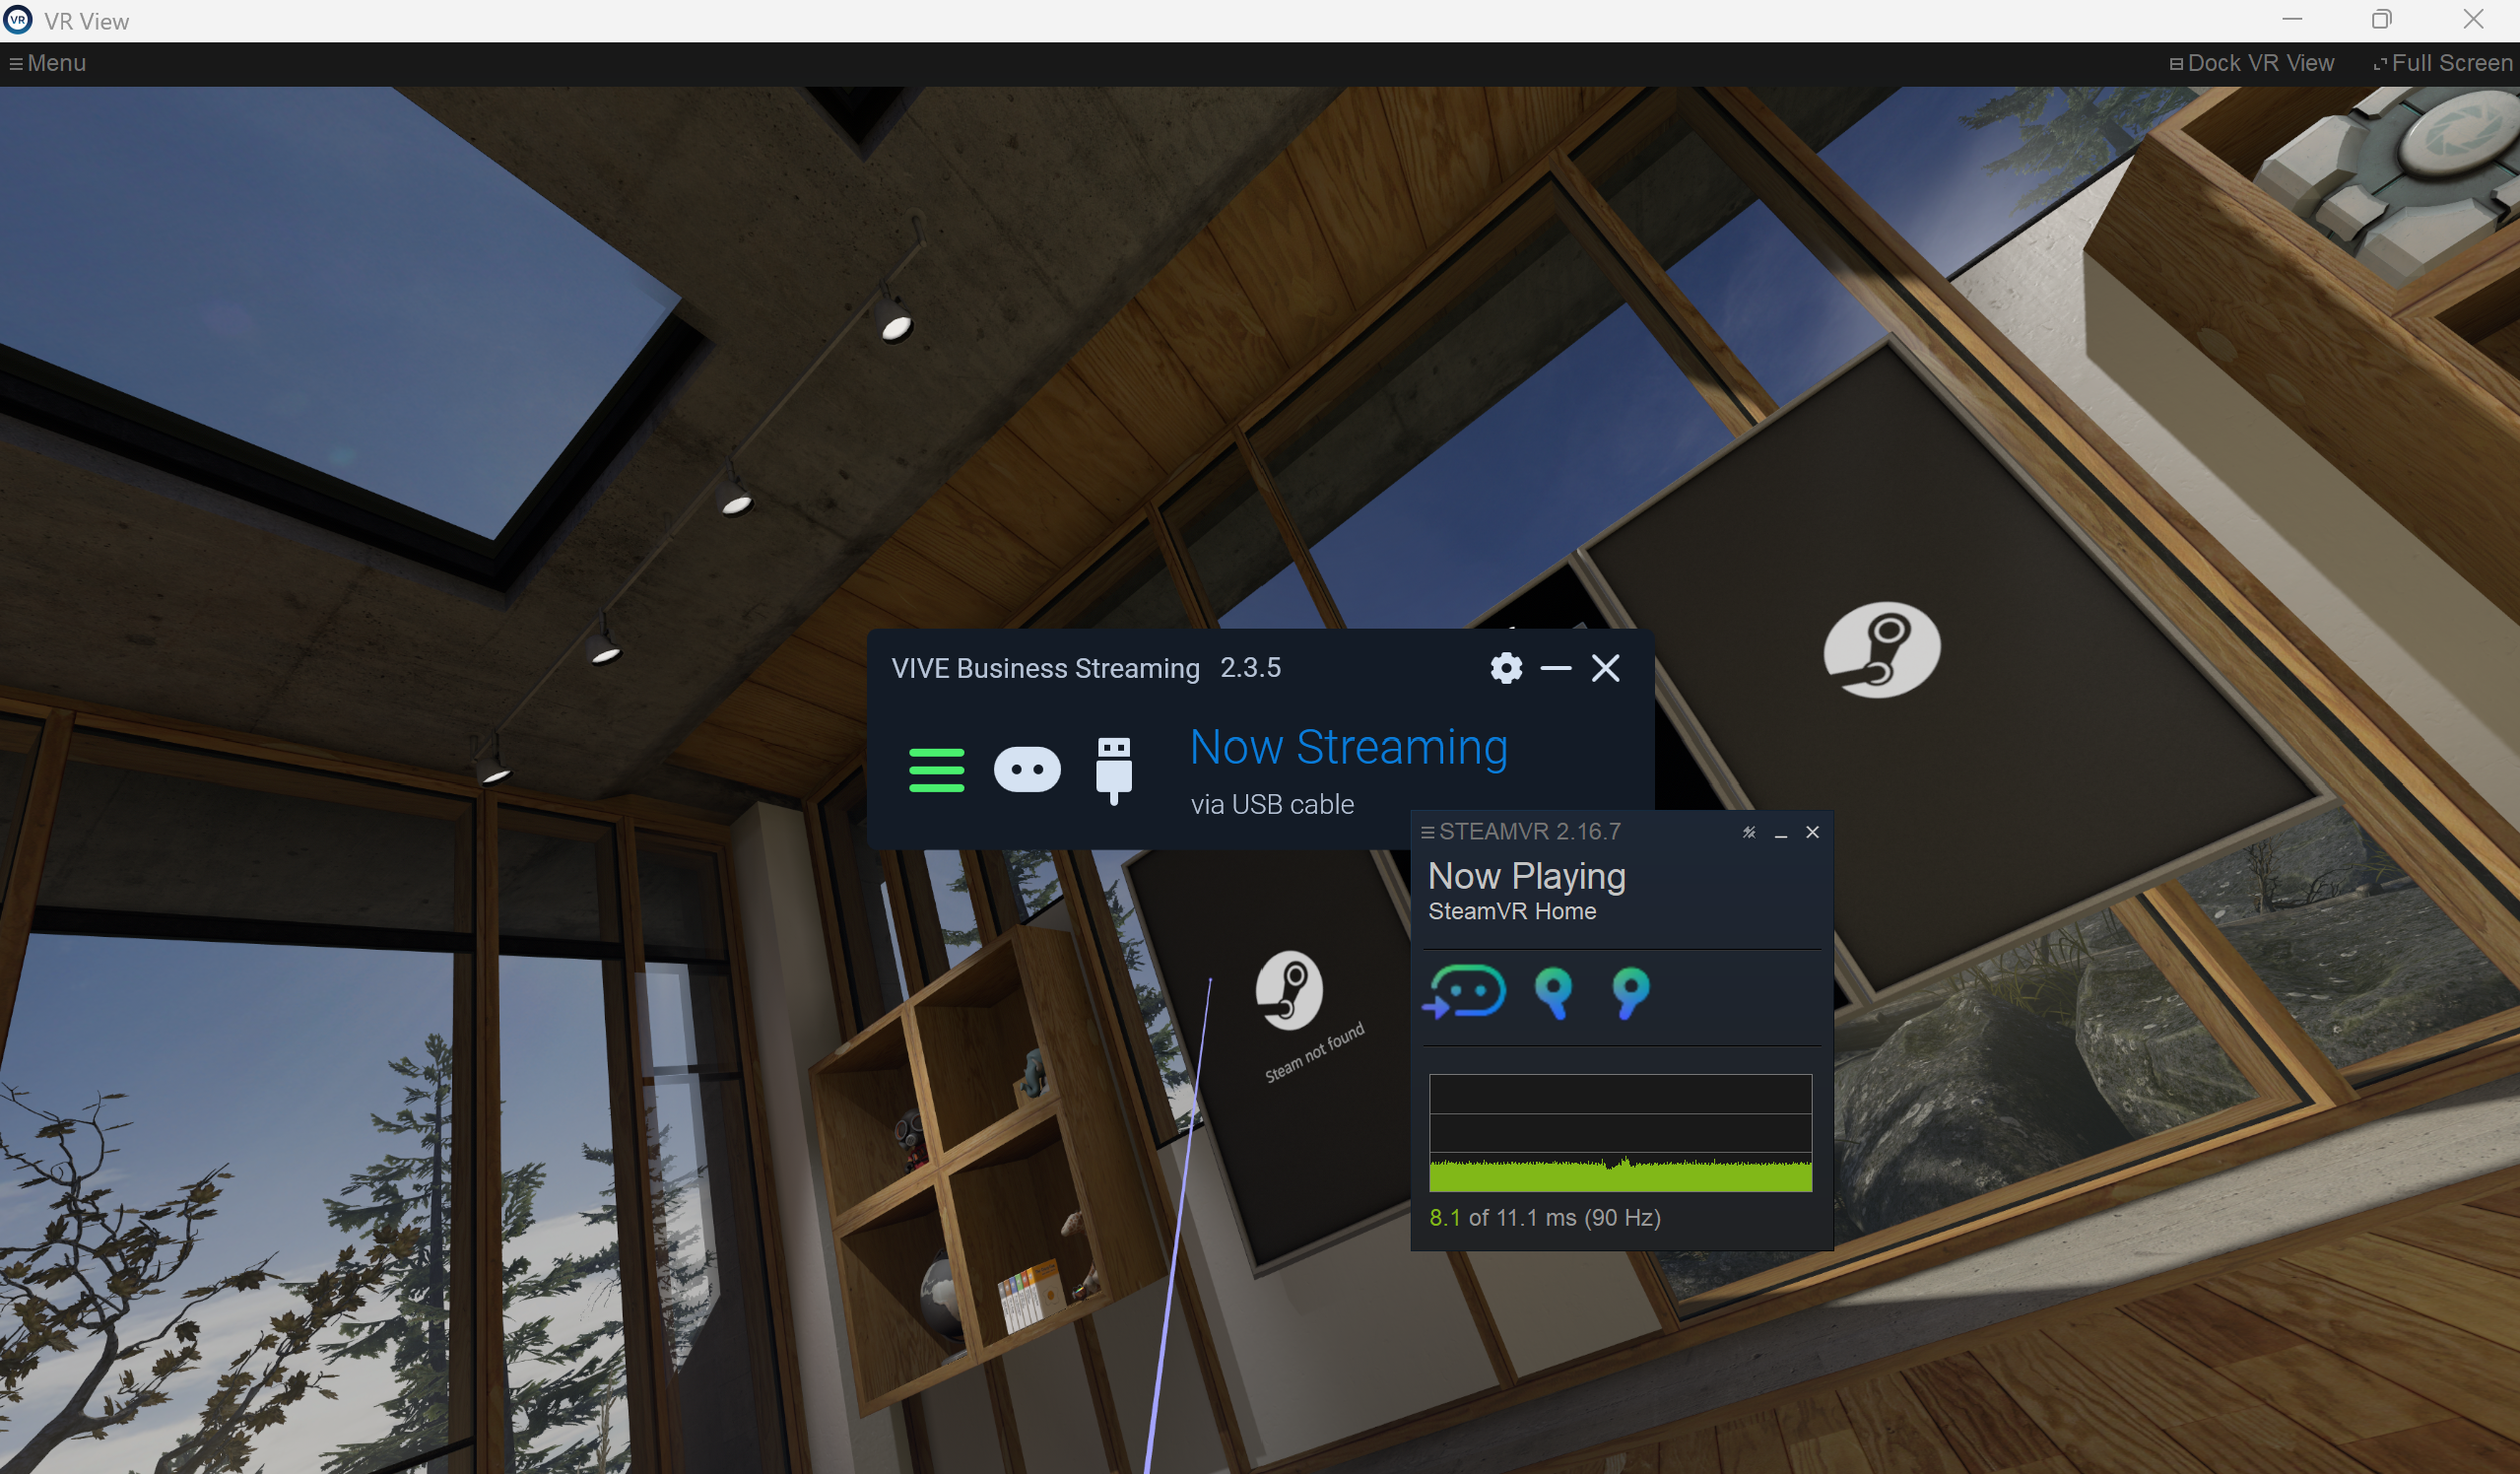 |
2. Connect your headset and open its mirror window. The recorder records the headset's view through a mirror window on the desktop: Vive and Steam Link: right-click the SteamVR Status window and choose Display VR View. Meta Quest Pro over Meta Horizon Link: open the Oculus Mirror. Pimax Dream Air: turn on Screen Mirror (Right Eye). For desktop apps, skip this step. |
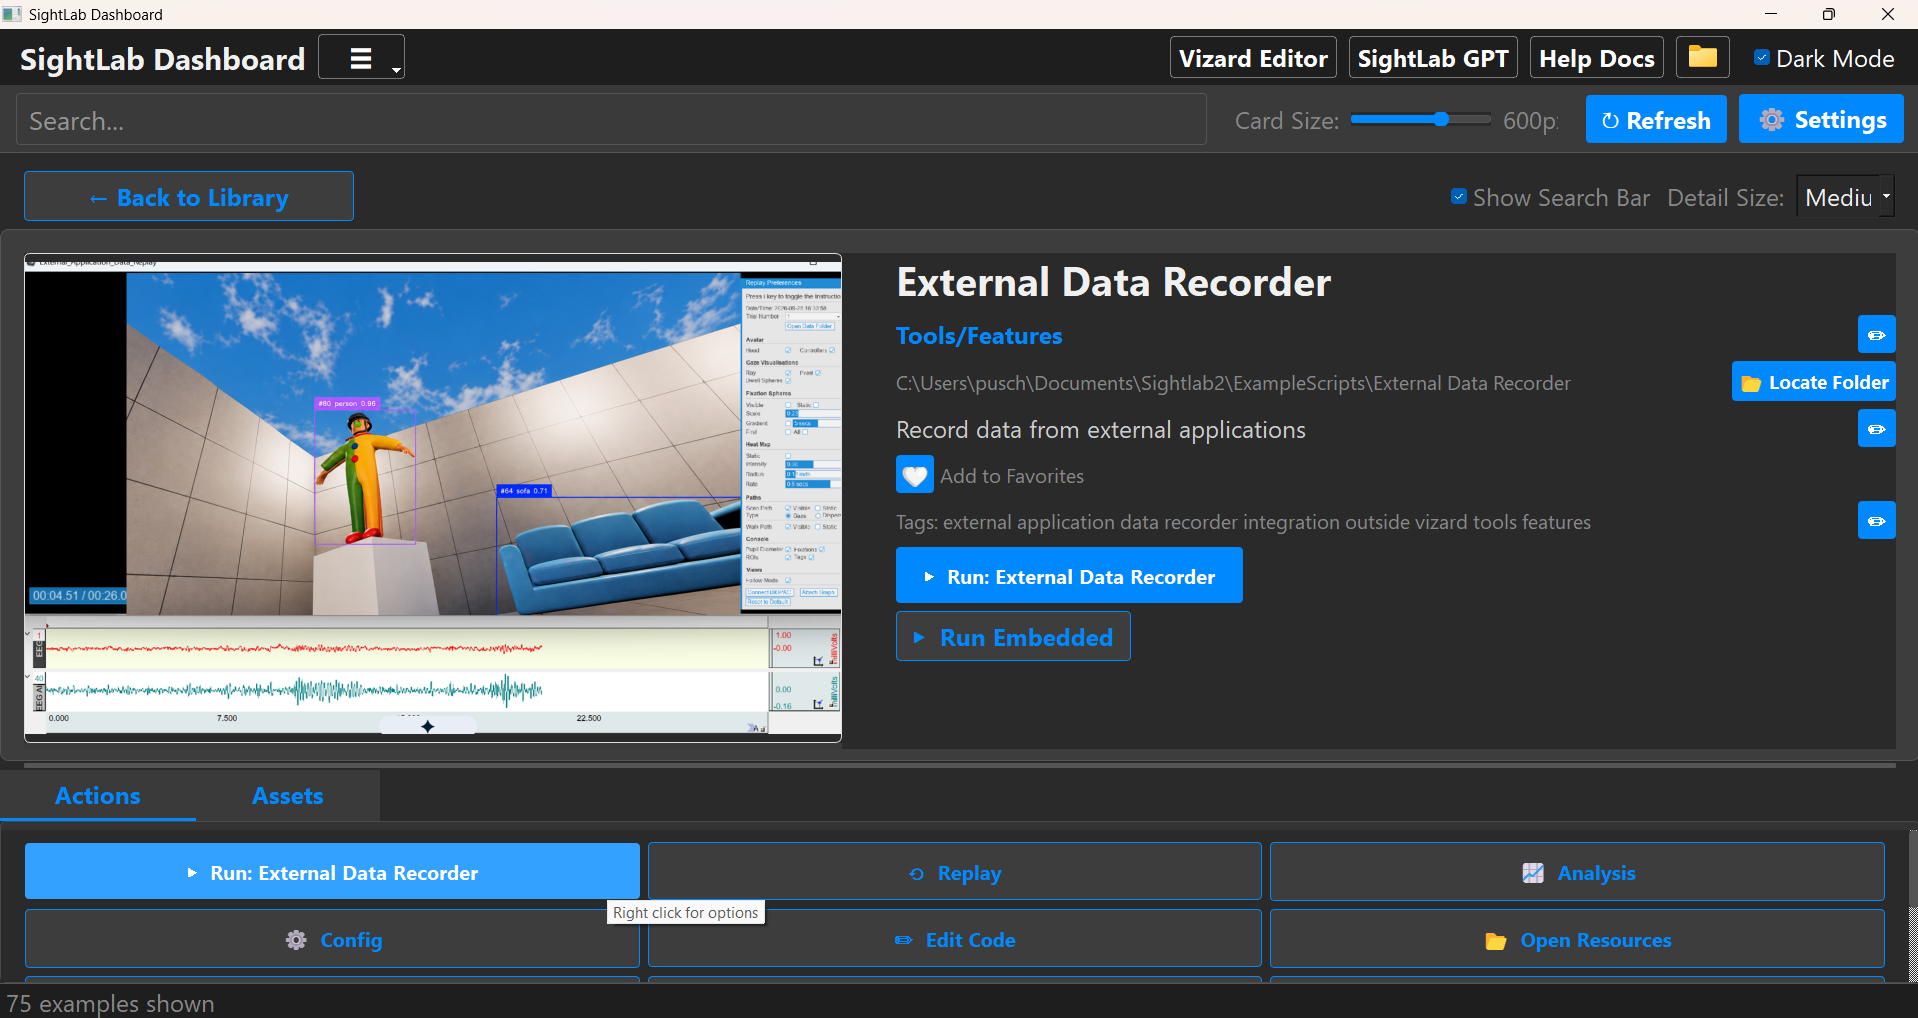 |
3. Start the External Data Recorder. In the SightLab Dashboard, go to Tools/Features > External Data Recorder and click Run: External Data Recorder. You can also open External_Data_Recorder.py in Vizard and click the green run arrow. |
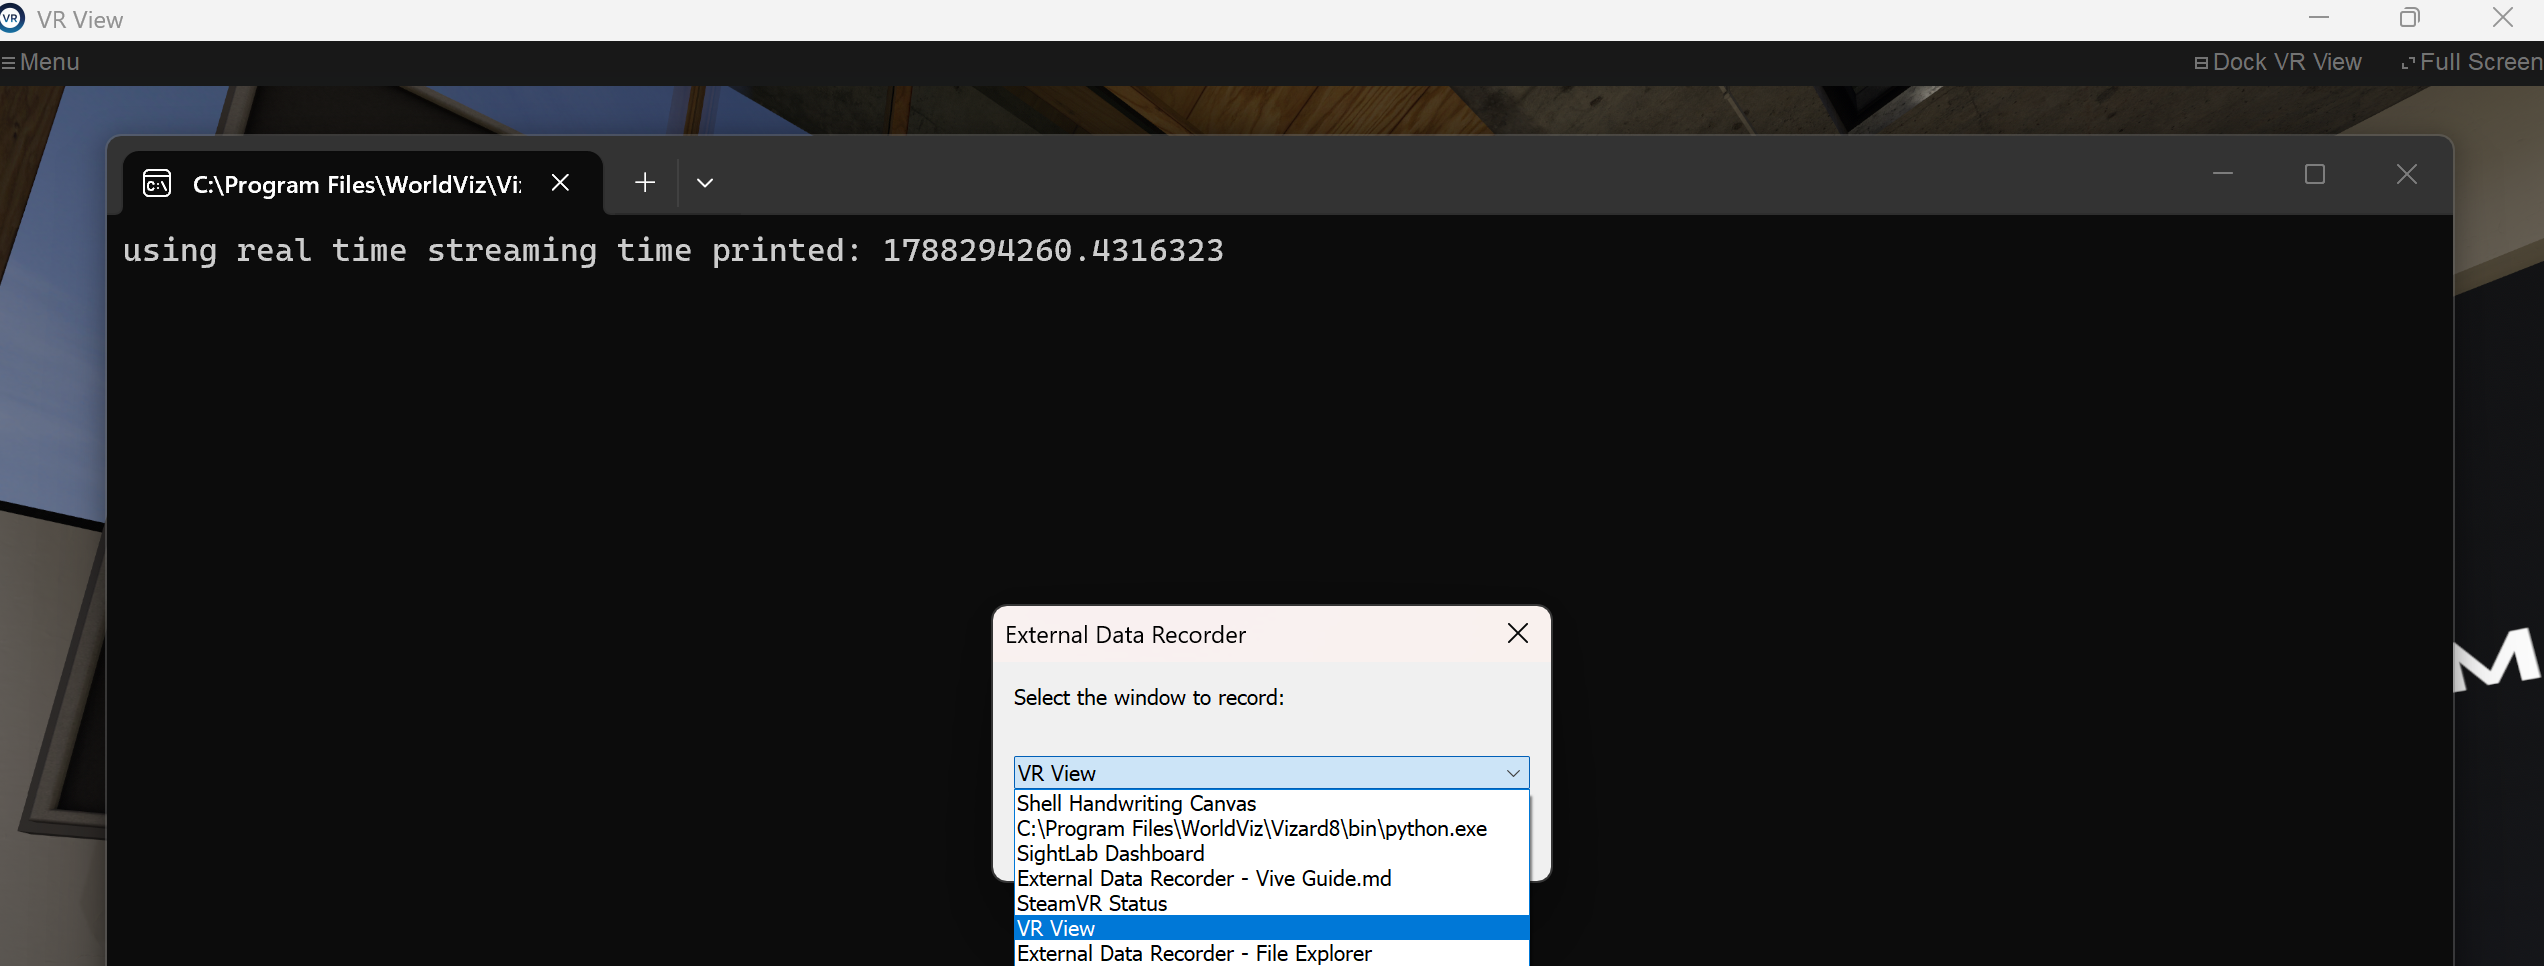 |
4. Choose the window to record. For a headset, choose its mirror window (here, VR View). For a desktop app, choose the app's window. The window can be covered by other windows, but it must not be minimized at any point. |
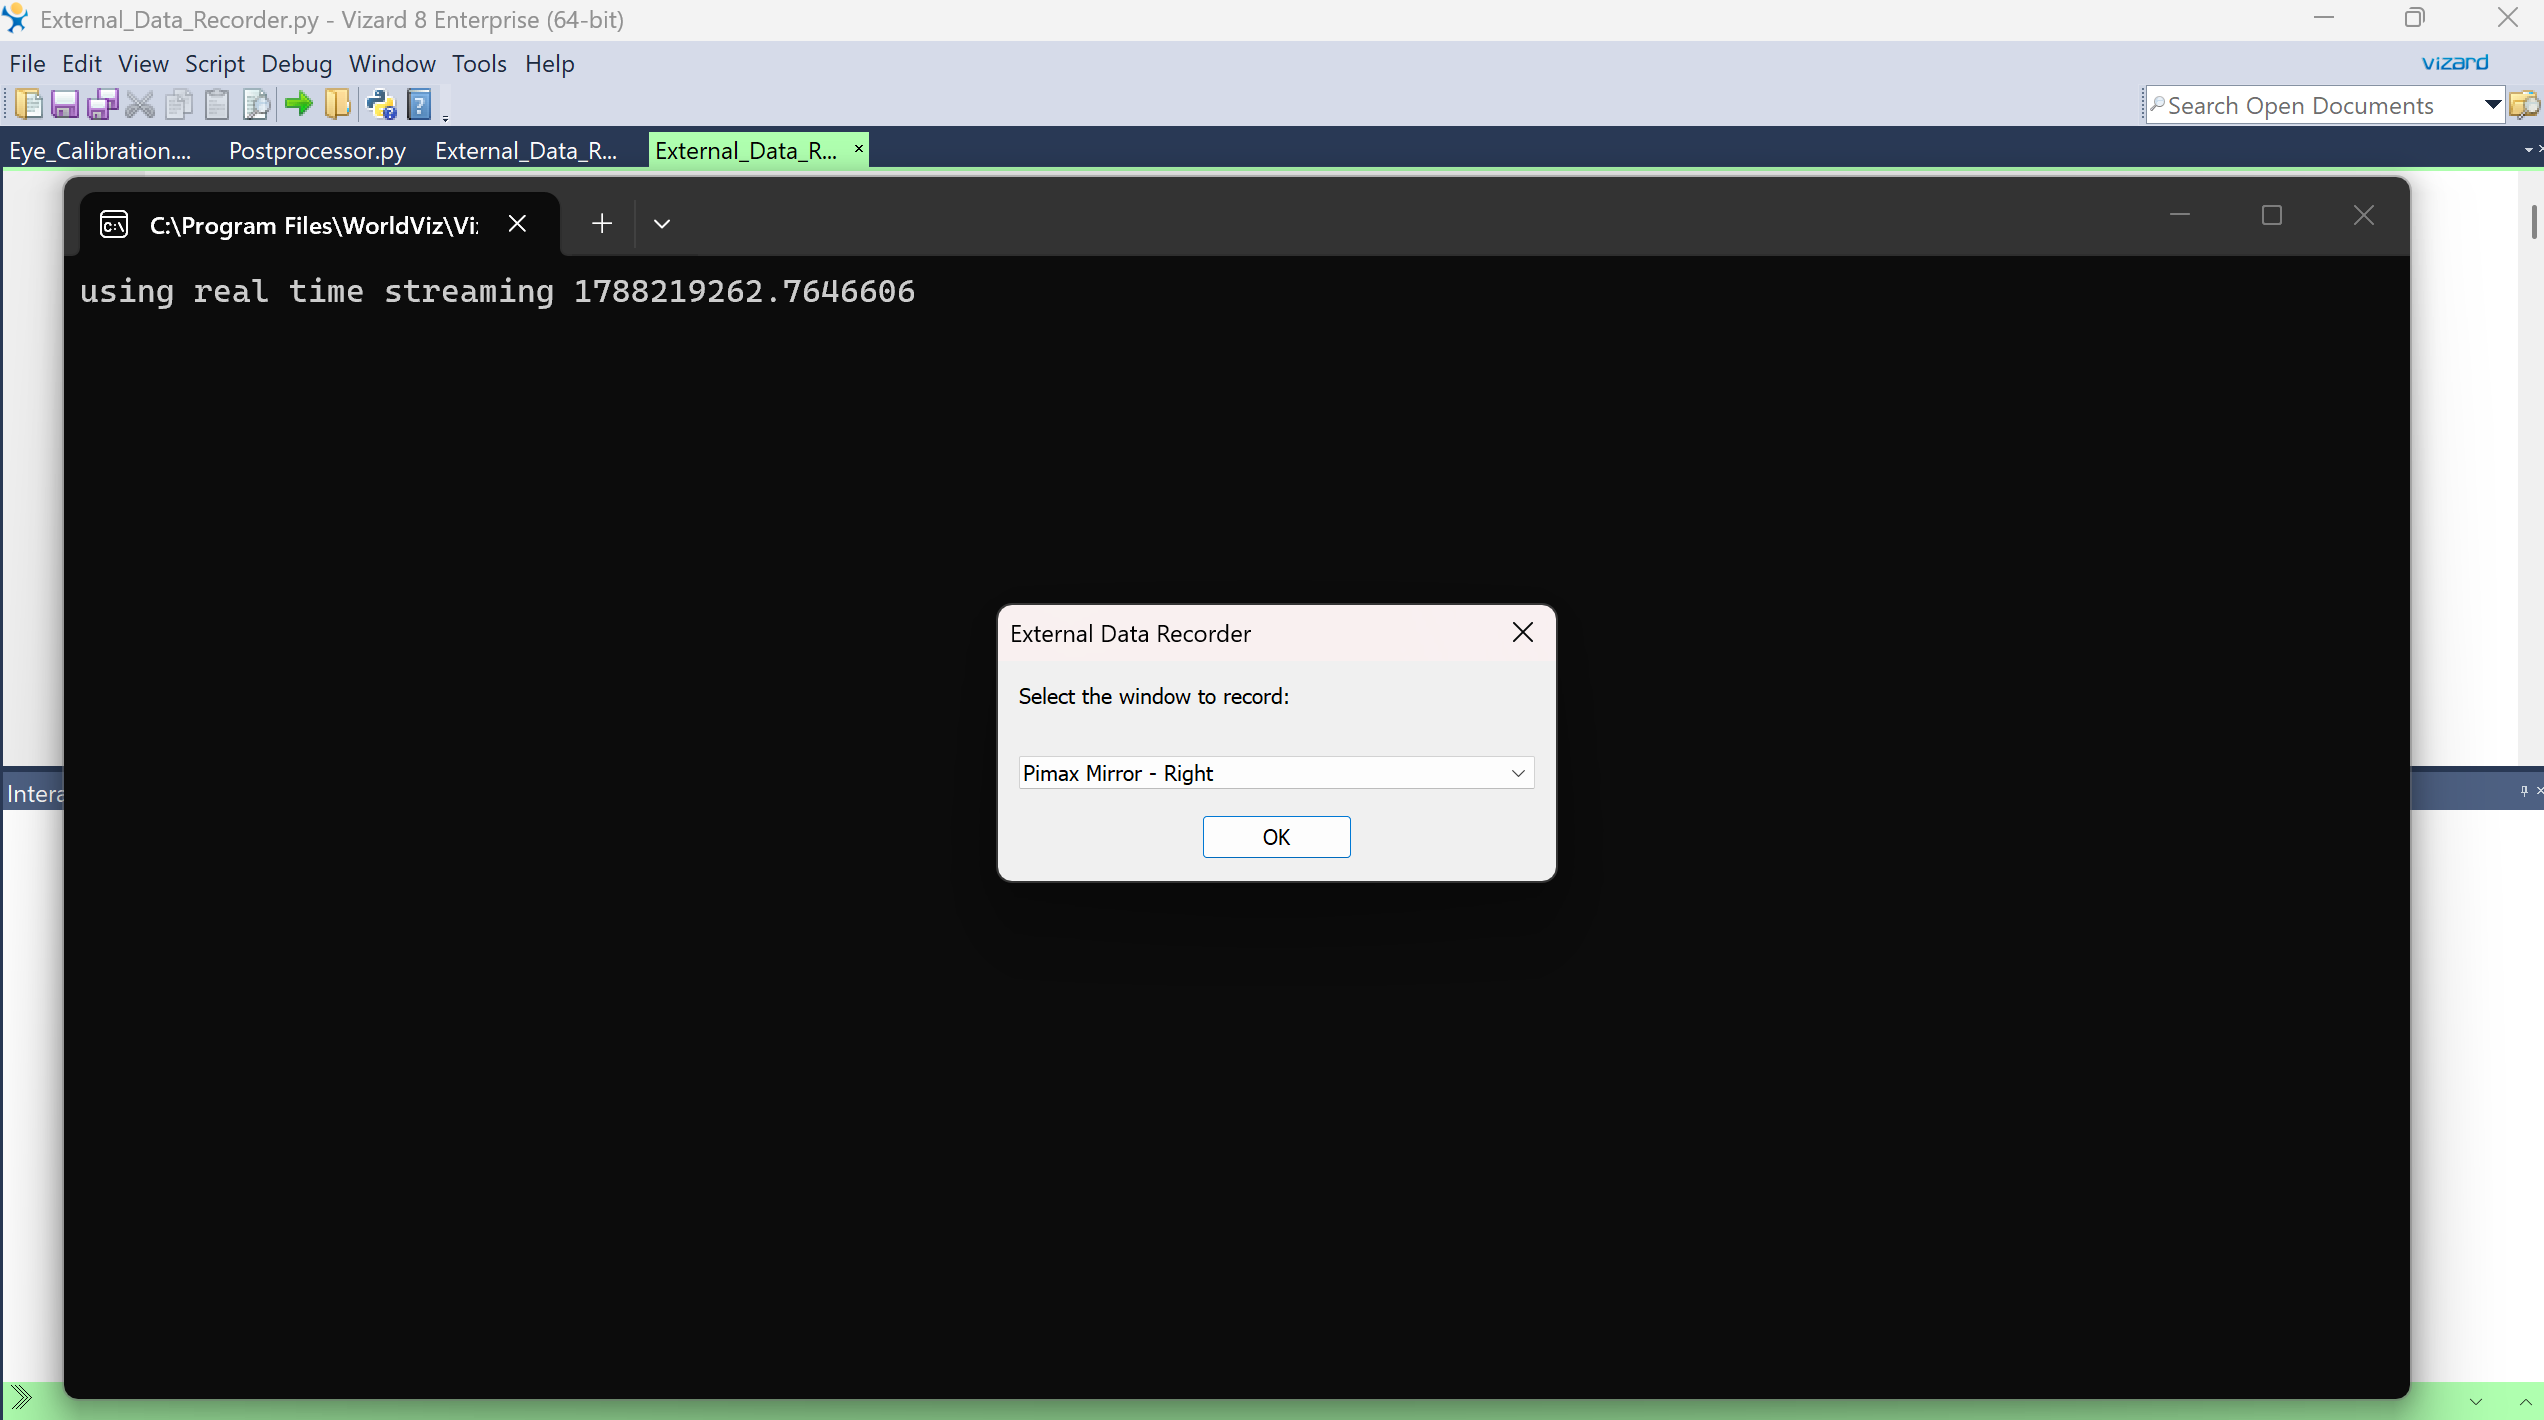 |
5. Keep an eye on the console. A console window opens with the recorder. Press Alt+Tab to switch to it at any time to see progress, calibration results, and errors. Set DEBUG = True in Data_Recorder_Config.py for more detail. The console output is also saved to the logs folder. |
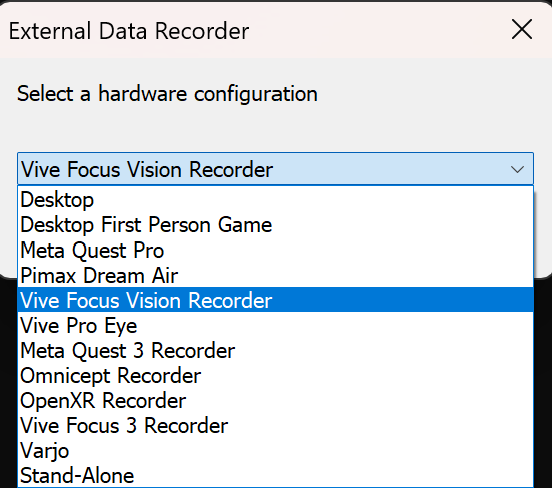 |
6. Choose your hardware. Pick the configuration that matches your headset or desktop setup (see Choosing a Hardware Configuration). |
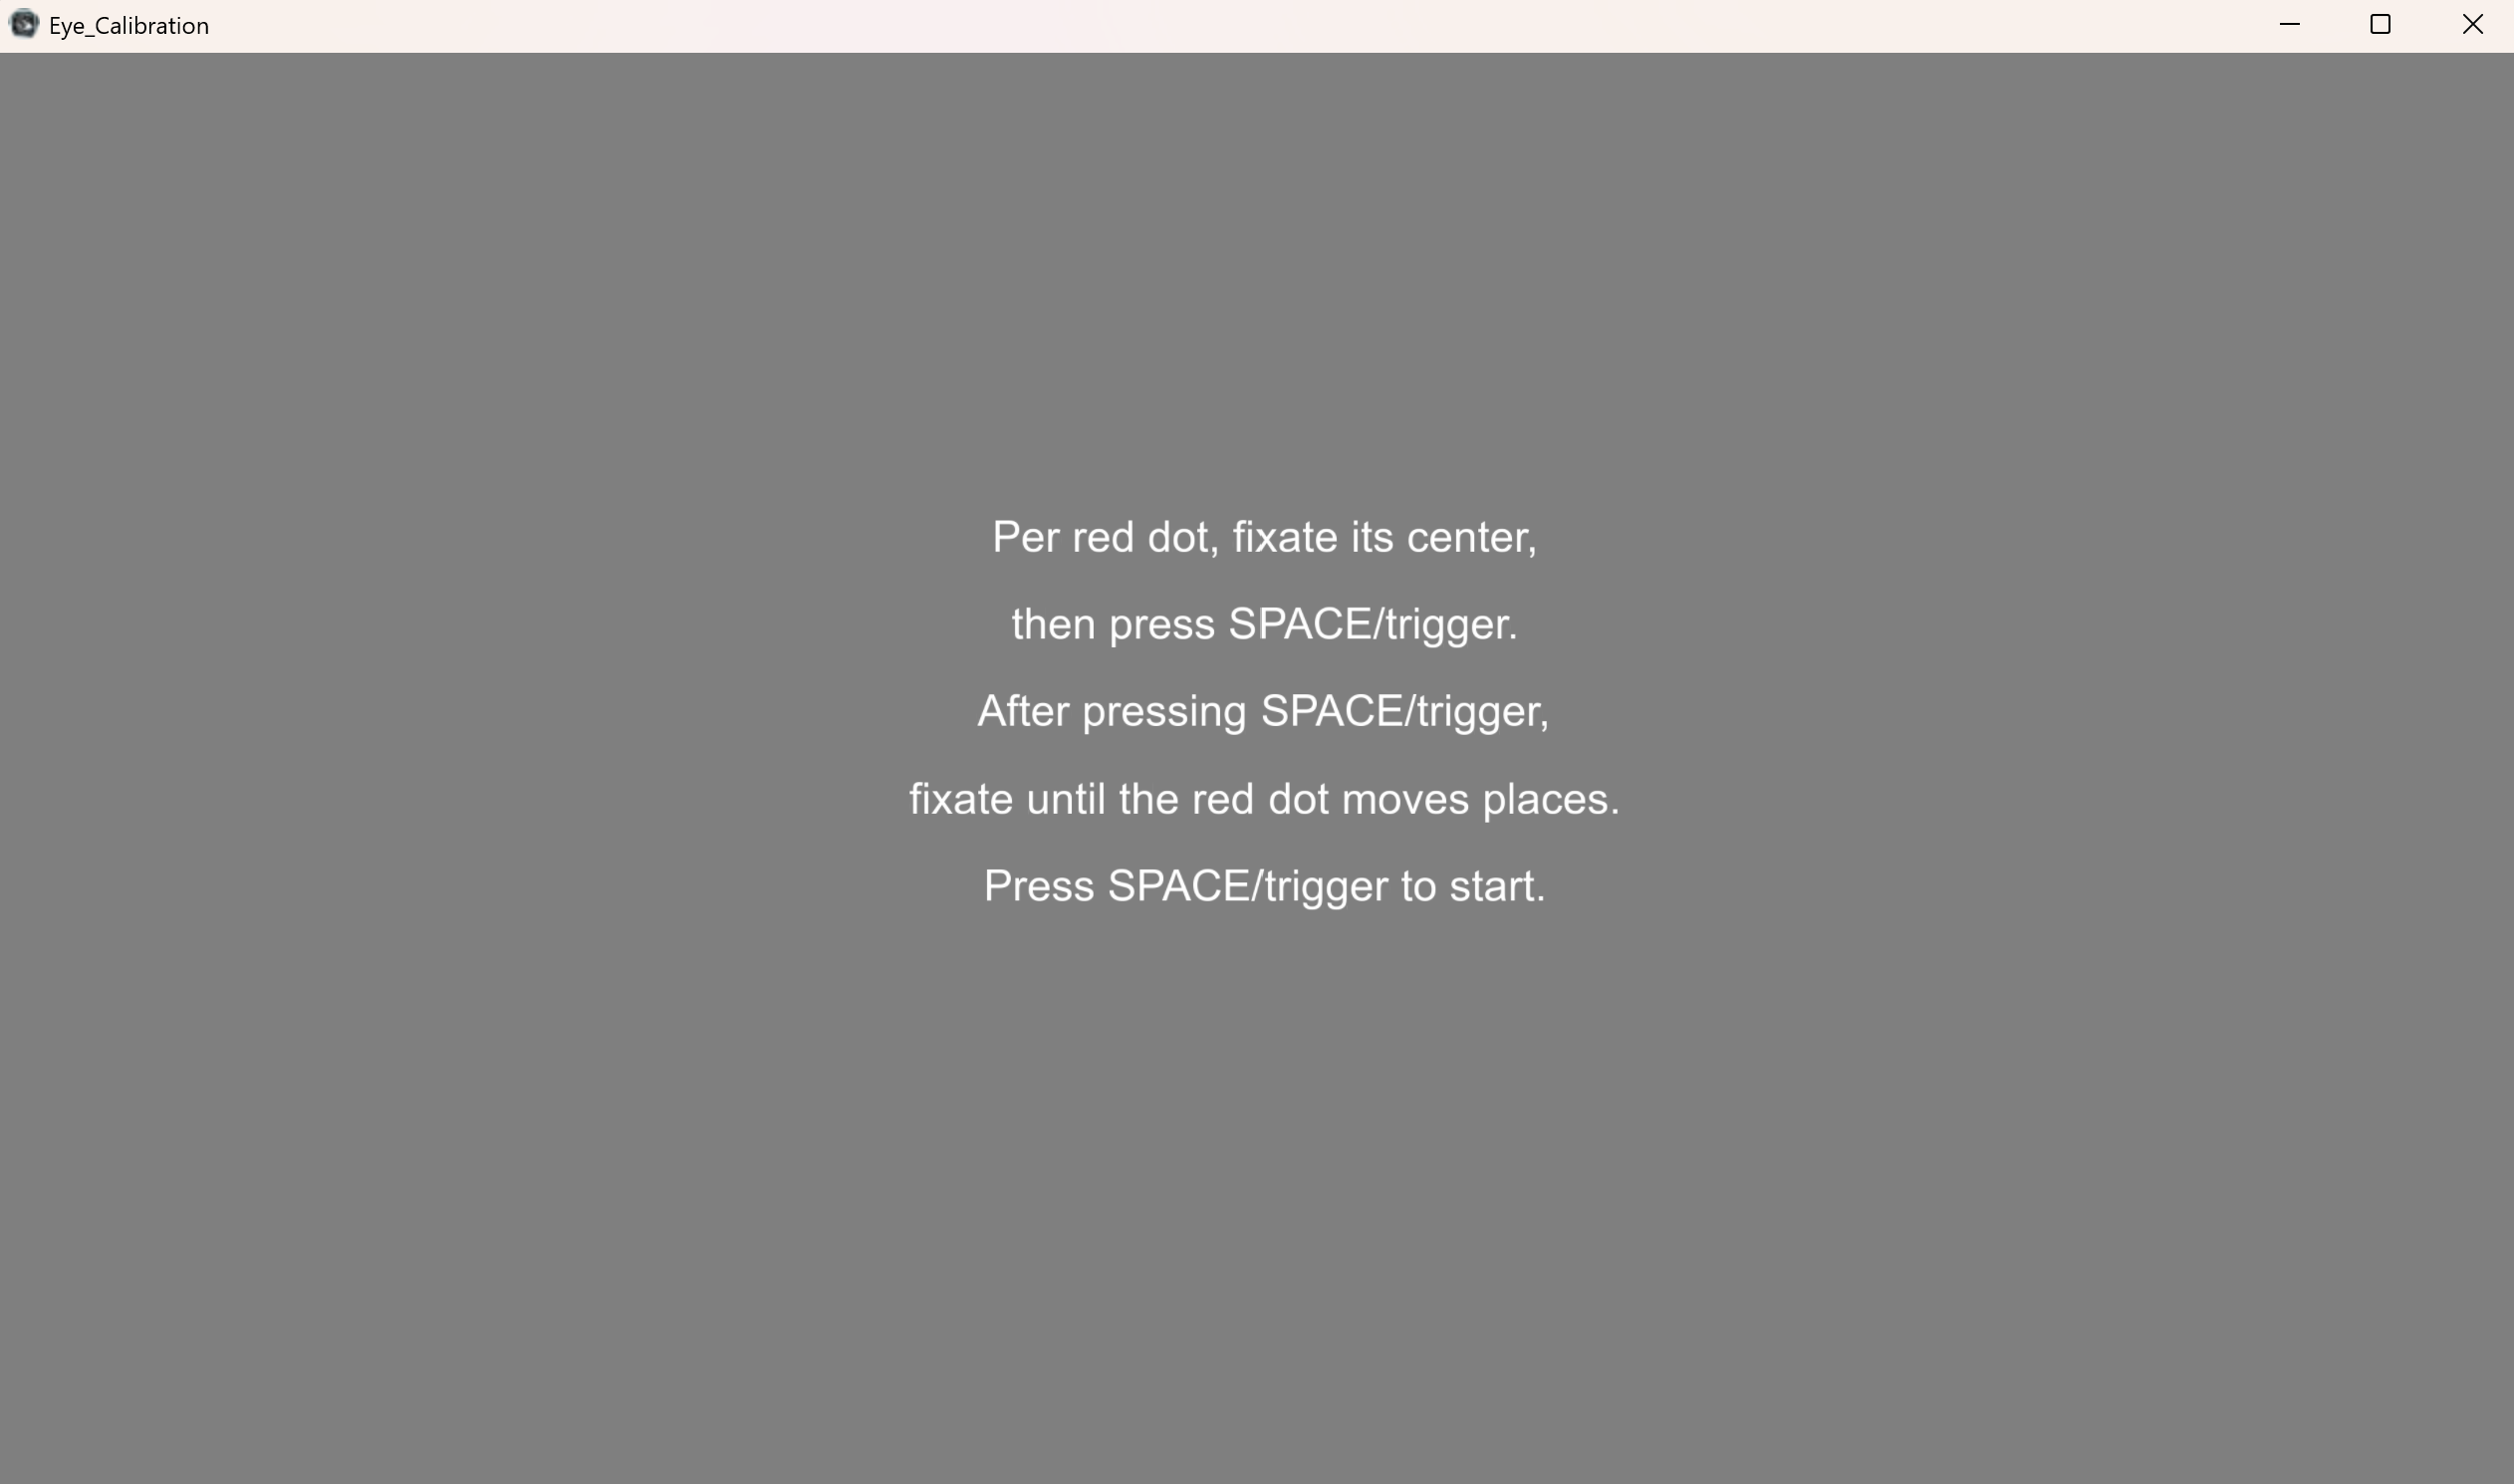 |
7. Calibrate the eye tracker. When asked for a calibration file, choose New (You can also load an existing calibration. Make sure to load a calibration for the same hardware you are using. It is recommended to do a new calibration if you've removed the headset). In the headset, look at the center of each red dot, press the trigger or Spacebar, and keep looking until the dot moves. Keep your head still. Hardware without eye tracking skips this step. See the Eye Calibration Guide. |
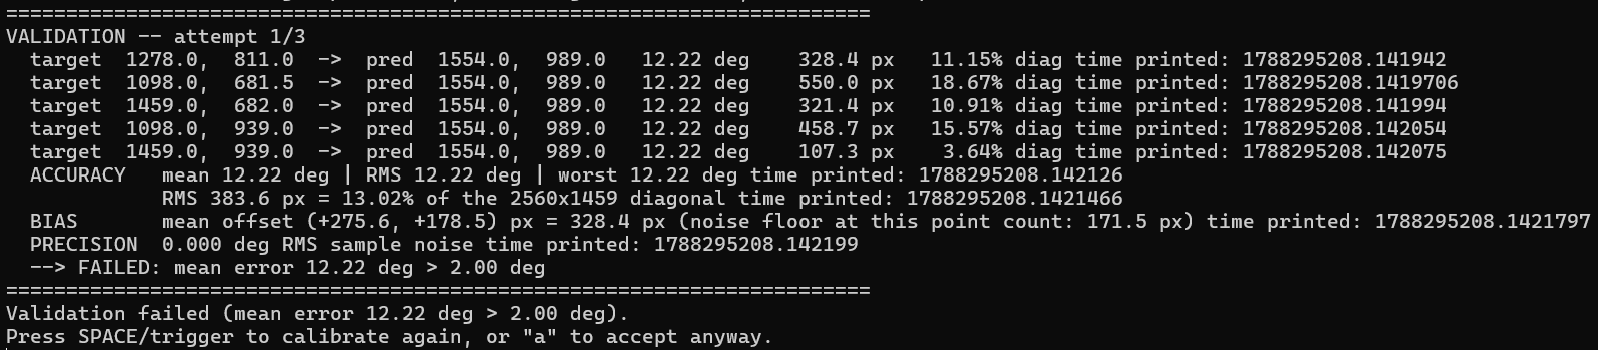 |
8. Check the validation. After 9 calibration dots, 5 validation dots measure the accuracy in degrees. If the error is too high, the console says so: press the trigger or Spacebar to calibrate again, or A to accept the result. After three failed rounds, the most accurate one is kept. |
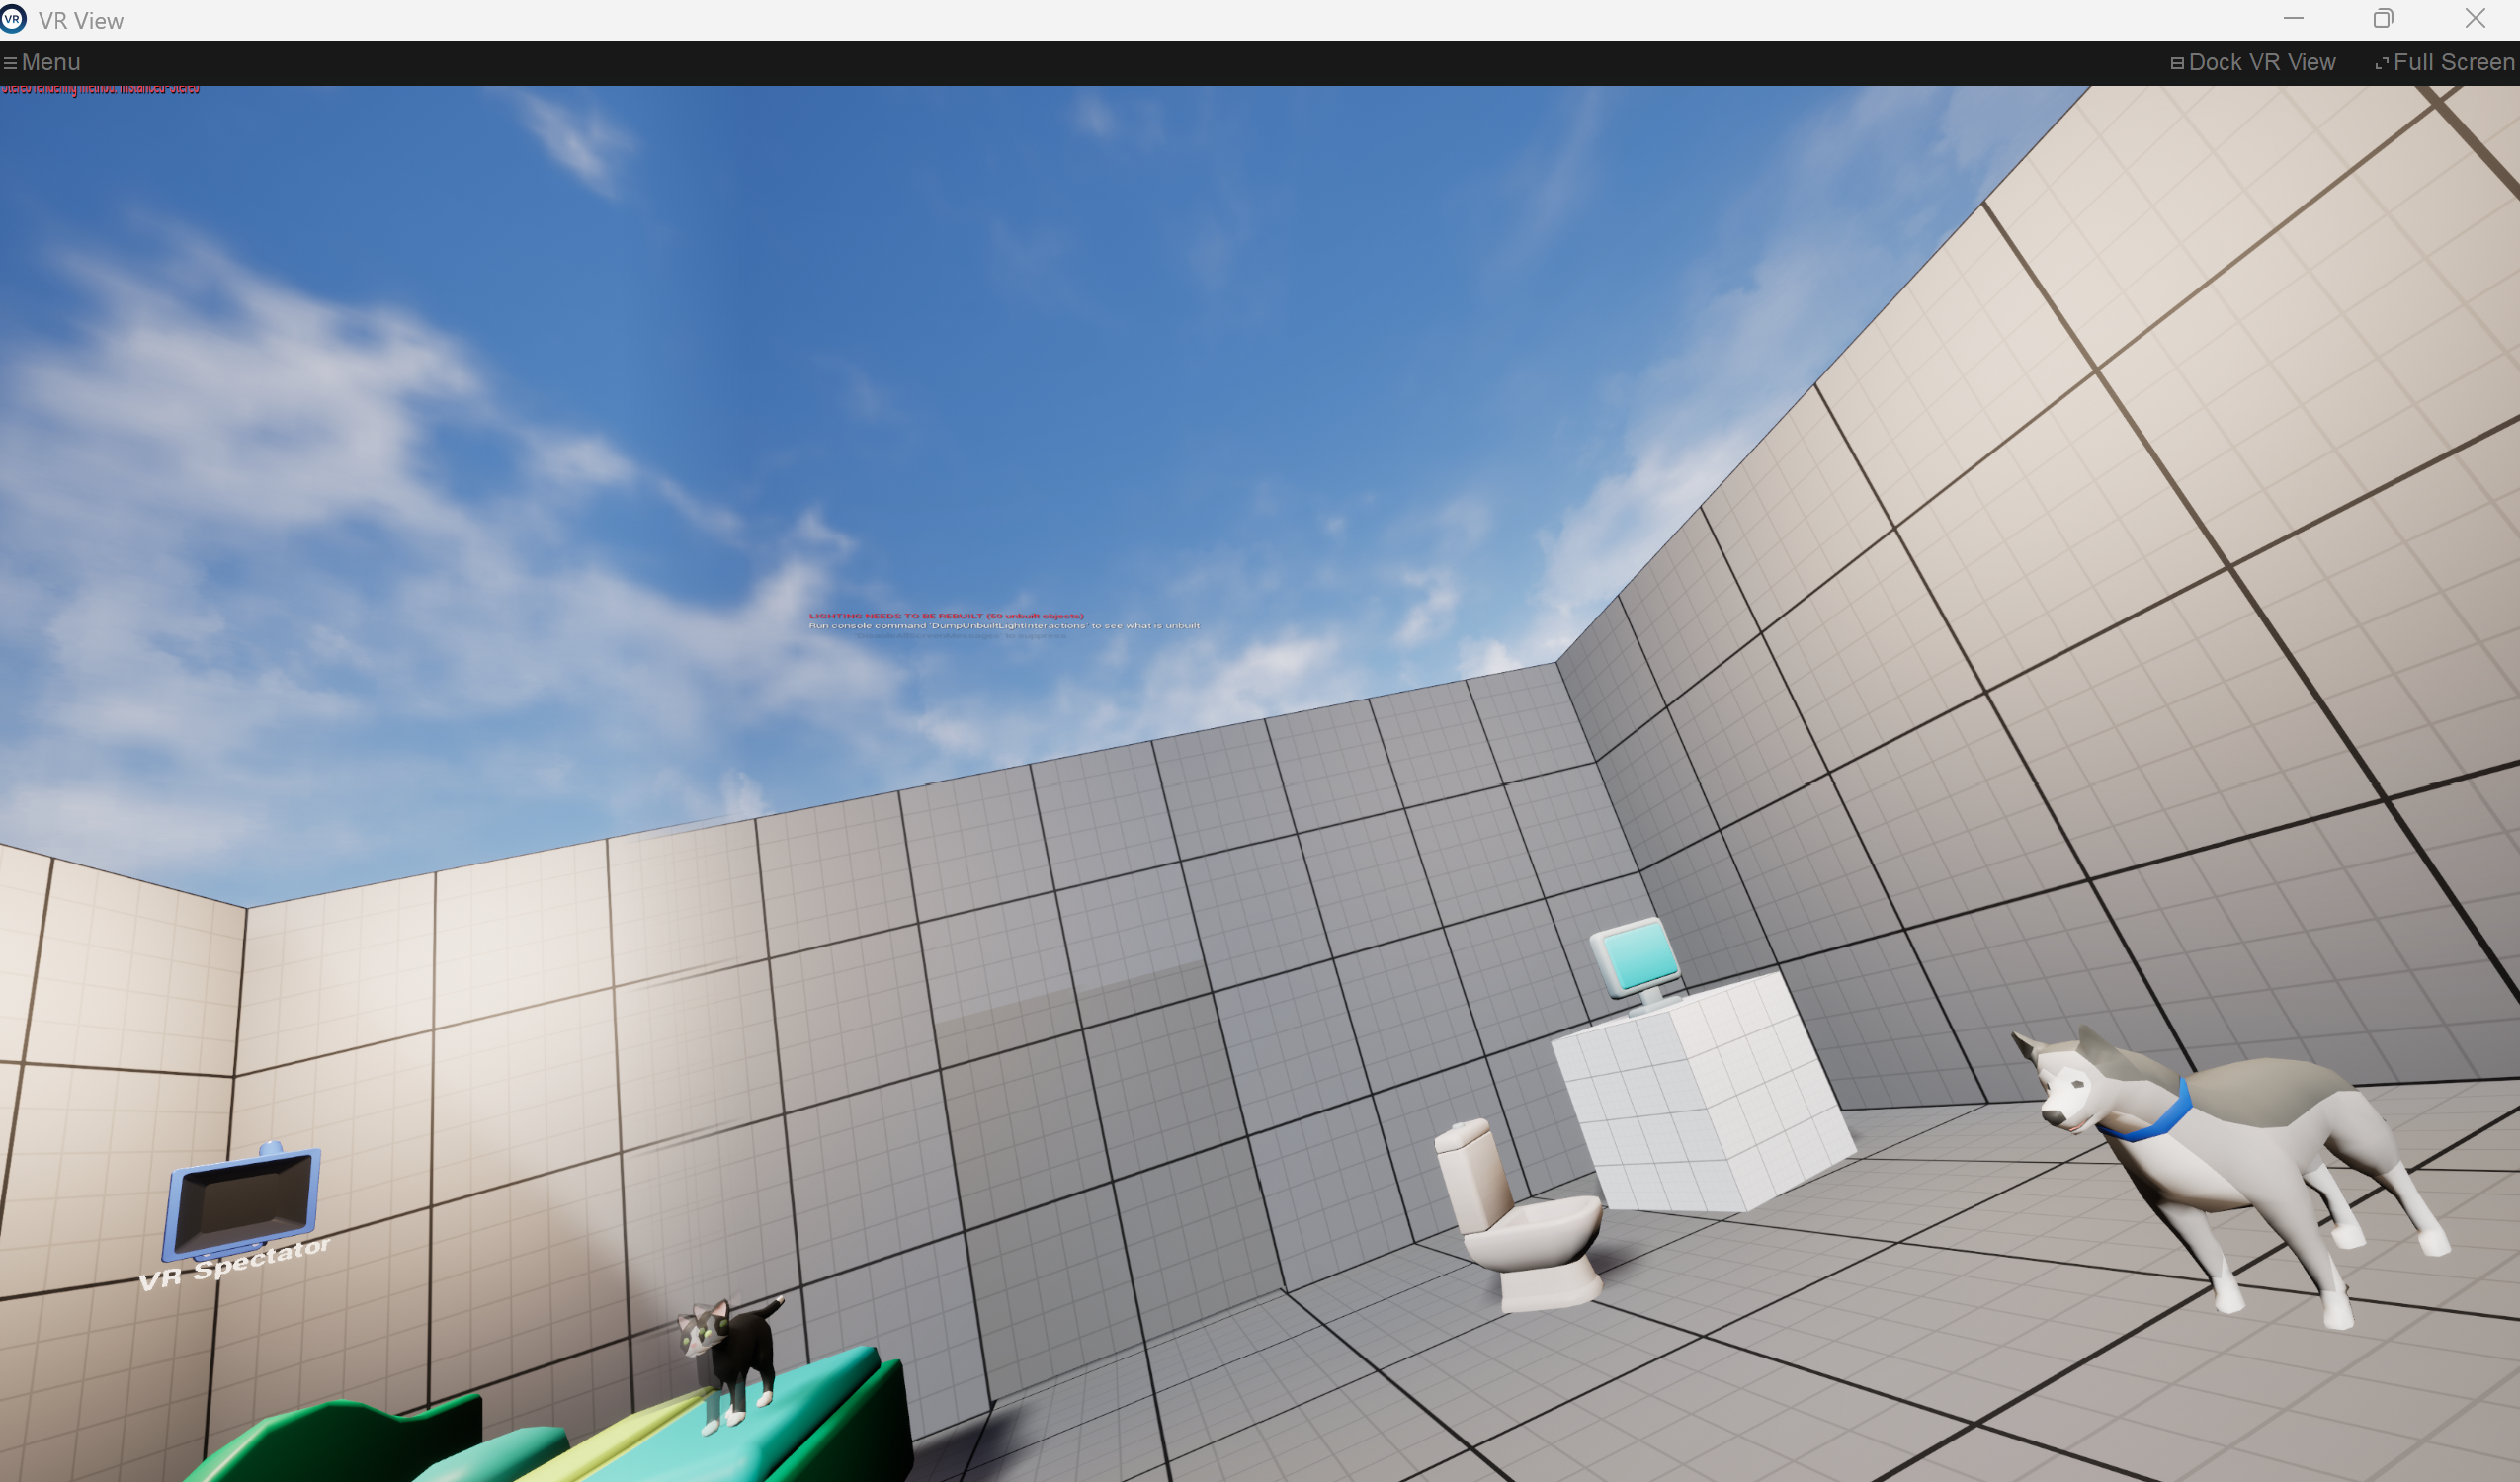 |
9. Open your external application. Start the app you want to record and make sure it shows in the mirror window. With OpenXR runtimes, you'll be asked to choose the app, and it's brought into focus when the trial starts. |
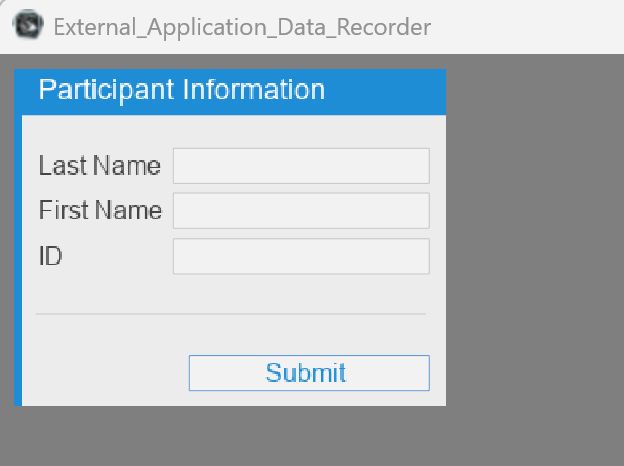 |
10. Set the recording length and participant. Enter how many seconds to record (10 by default), then optionally enter the participant's name and ID and click Submit. |
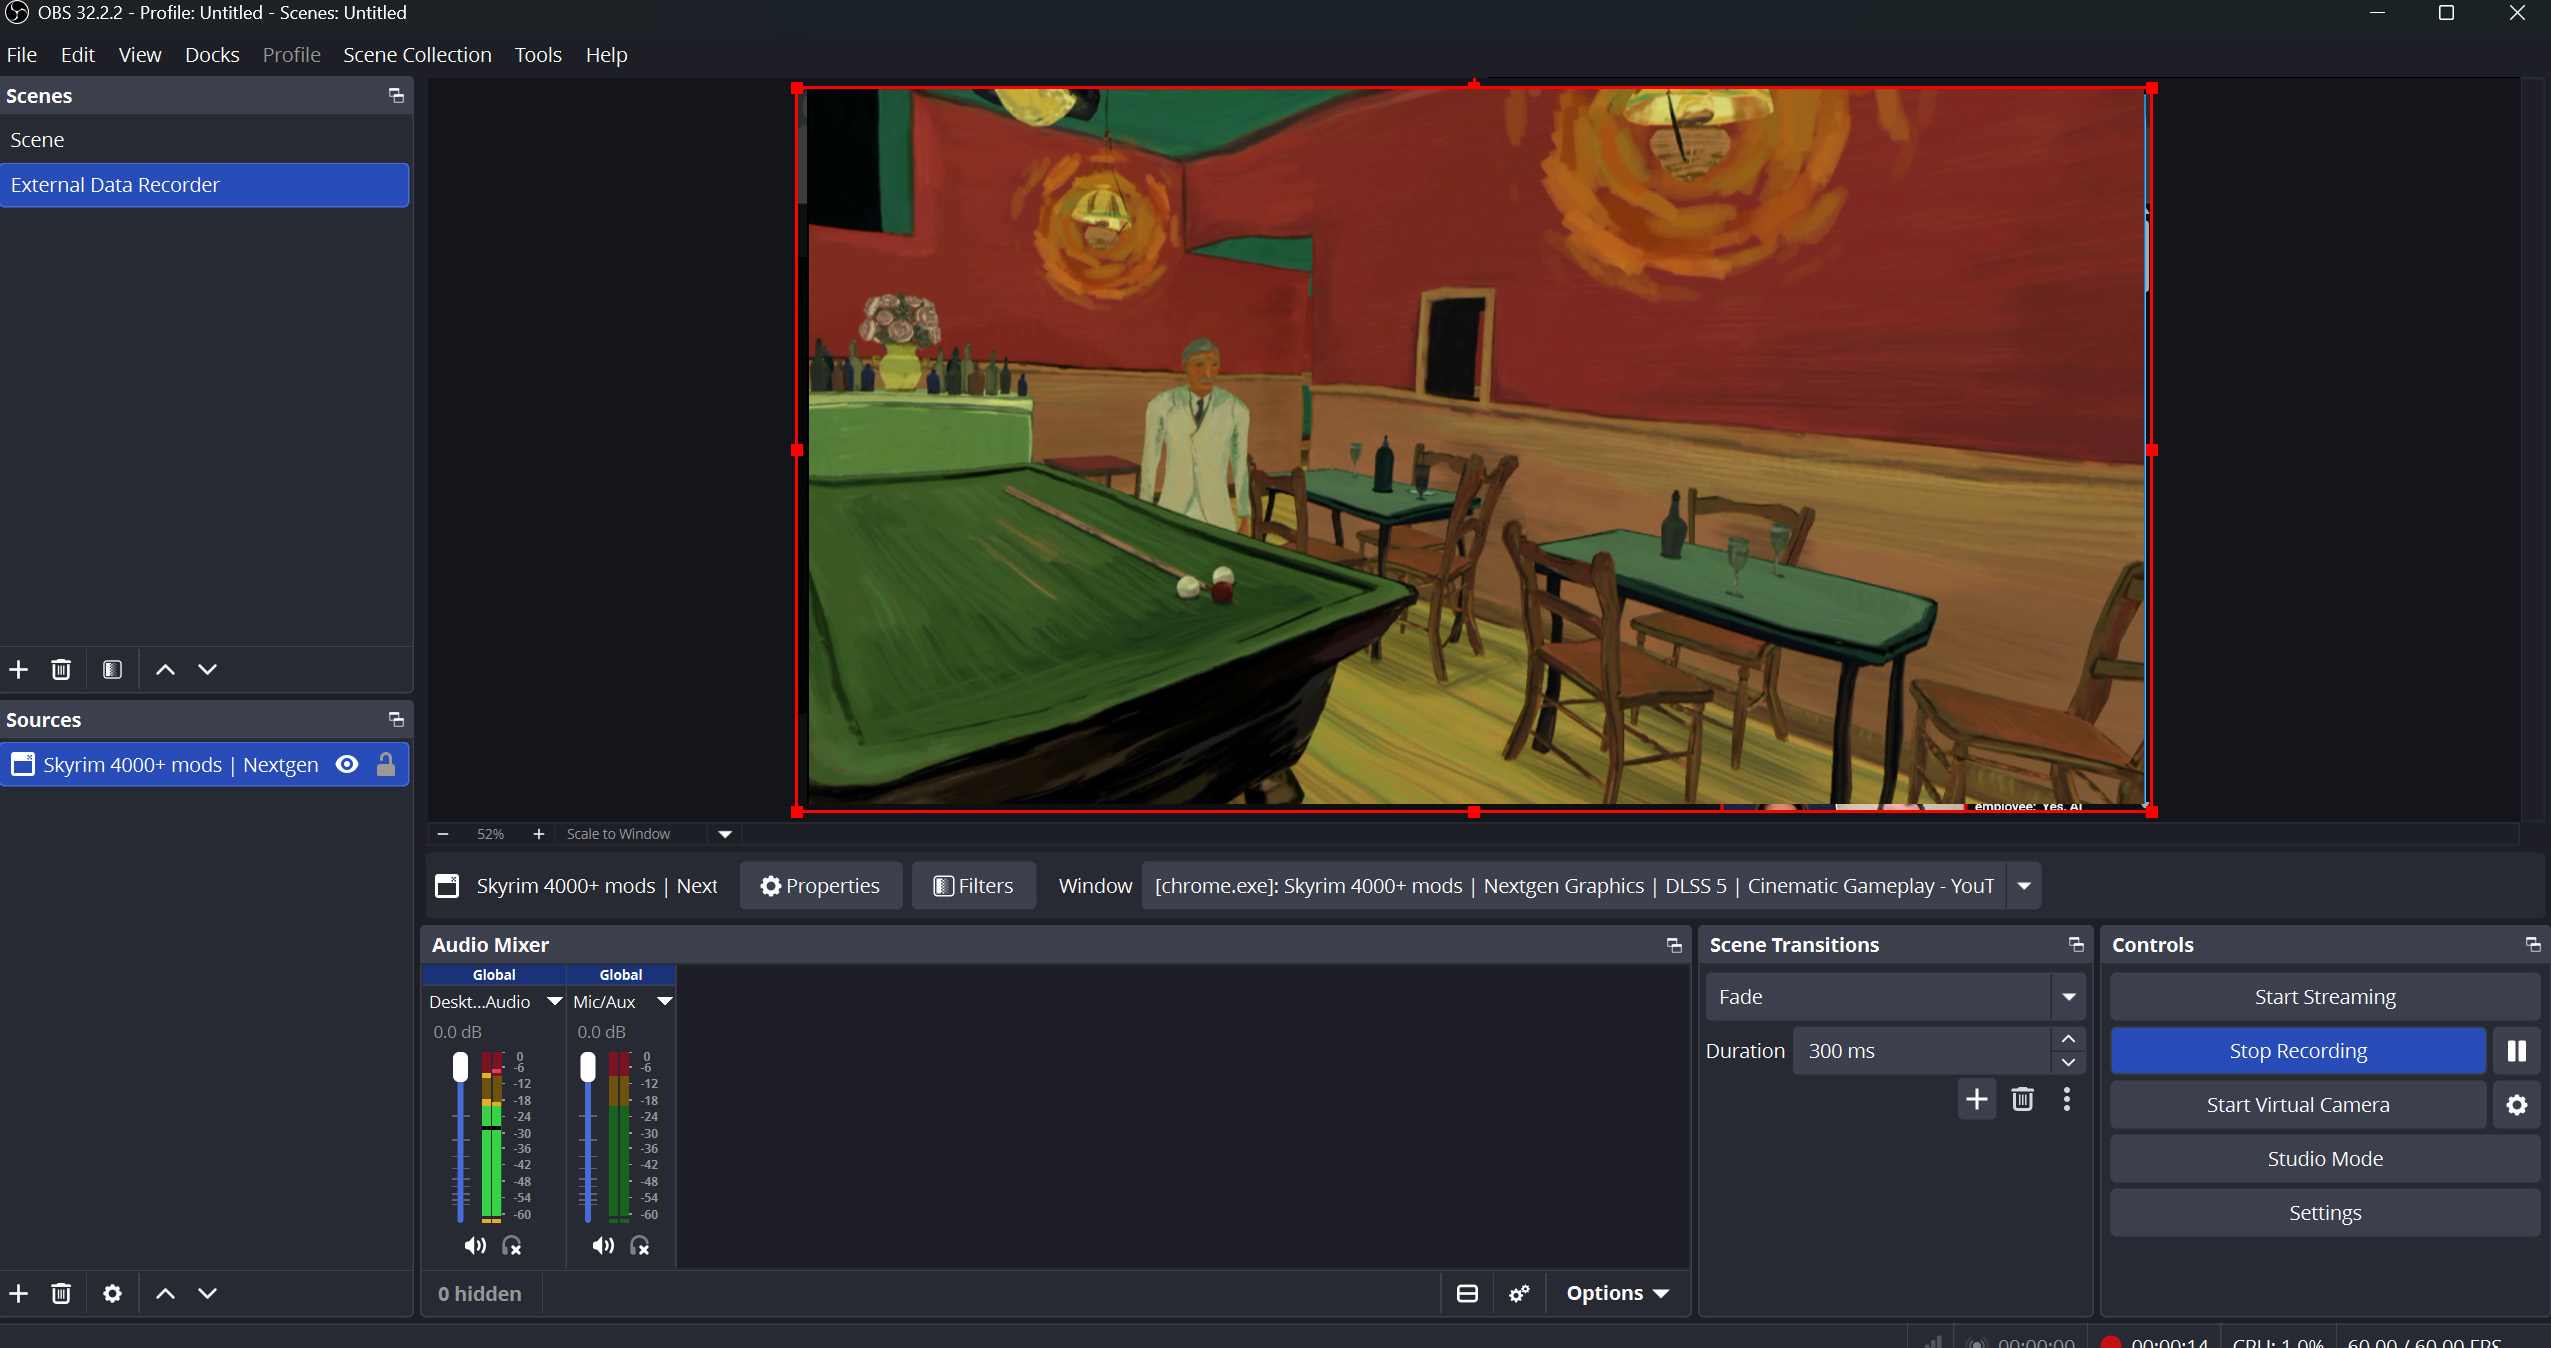 |
11. Record. Press Spacebar to start. OBS records the window in its own External Data Recorder scene, and a red dot appears on the OBS icon in the taskbar while it records. A beep plays when the trial ends. If Biopac is connected, AcqKnowledge acquisition starts with the recording. |
 |
12. Wait for postprocessing. The recording is analyzed with AI object detection and gaze data. Don't close the recorder window; Alt+Tab to the console to follow progress. Closing SteamVR, Unreal, or Unity first makes this much faster. For Desktop First Person Game and Meta Quest 3 Recorder, you'll be asked to crop the recording and adjust the gaze point. See the Postprocessing Guide. |
 |
13. Find your data. When the session is finished, close the window. Videos are in recordings, data files in data, calibration results in calibration_data, and console logs in logs (see What Gets Recorded). |
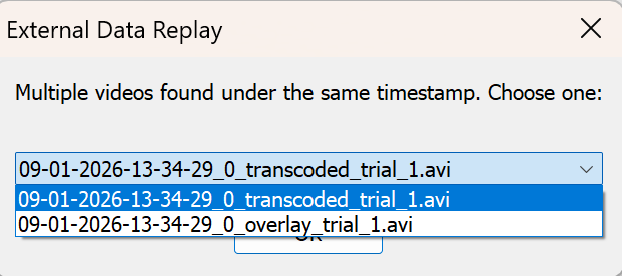 |
14. Replay the session. Click Replay in the Dashboard, or run External_Data_Replay.py. Choose the session, the calibration (Same as video if you calibrated in that session), and the overlay or transcoded video (see Session Replay). Note: the Overlay window will show the detected object bounding boxes. |
Choosing a Hardware Configuration
| Hardware option | Gaze point | Calibration | Guide |
|---|---|---|---|
| Vive Focus Vision Recorder, Vive Focus 3 Recorder, Vive Pro Eye | Headset eye tracking (SRanipal) | Yes | Vive Headsets |
| Meta Quest Pro | Headset eye tracking over Meta Horizon Link | Yes | Meta Headsets |
| Steamlink | Headset eye tracking over Steam Link, for the Meta Quest Pro, Pico and Steam Frame | Yes | Steam Link |
| Pimax Dream Air | Headset eye tracking | Yes | Pimax Dream Air |
| Meta Quest 3 Recorder | Center of the headset view | No | Meta Headsets or Steam Link, or Meta Standalone Apps for apps that run on the headset |
| Desktop First Person Game | Center of the screen | No | Desktop and Desktop First Person |
| Desktop | Mouse cursor | No | Desktop and Desktop First Person |
| Omnicept Recorder, Varjo, OpenXR Recorder, Pupil Labs | Headset eye tracking | Yes | Guide coming soon |
Screen-based eye trackers (EyeLogic LogicOne, Tobii Spark) use a separate version of the recorder based on 1.0. See the Screen Based Eye Trackers guide.
How It Works
flowchart LR
    A[Choose the window<br>and hardware] --> B[Calibrate and<br>validate gaze]
    B --> C[Record the window<br>with OBS]
    C --> D[Postprocess: detect objects<br>and match gaze]
D --> E[Data files, videos,<br>and replay]- Why record the mirror window: calibration maps the eye tracker's gaze onto the pixels of the window you choose, so the same window, at the same size, has to be used from calibration through recording. Even without eye tracking, the mirror window matches what the participant actually sees more closely than the app's own desktop window.
- Calibration:
Eye_Calibration.pyopens in the headset, shows a grid of dots, finds each dot in the mirror window, and fits a mapping from gaze direction to window pixels. Validation then tests that mapping on separate dots. Resizing the mirror window or headset slippage after calibration reduces accuracy. - Recording: OBS records the chosen window while SightLab records eye tracking, physiological, and event data on the same timeline.
- Postprocessing:
Postprocessor.pyruns AI object detection on the recording, matches the gaze point to detected objects, writes the object CSV files, and creates the overlay and transcoded videos. It runs automatically after each trial whenAUTO_POSTPROCESS = True.
Scripts and Dashboard Actions
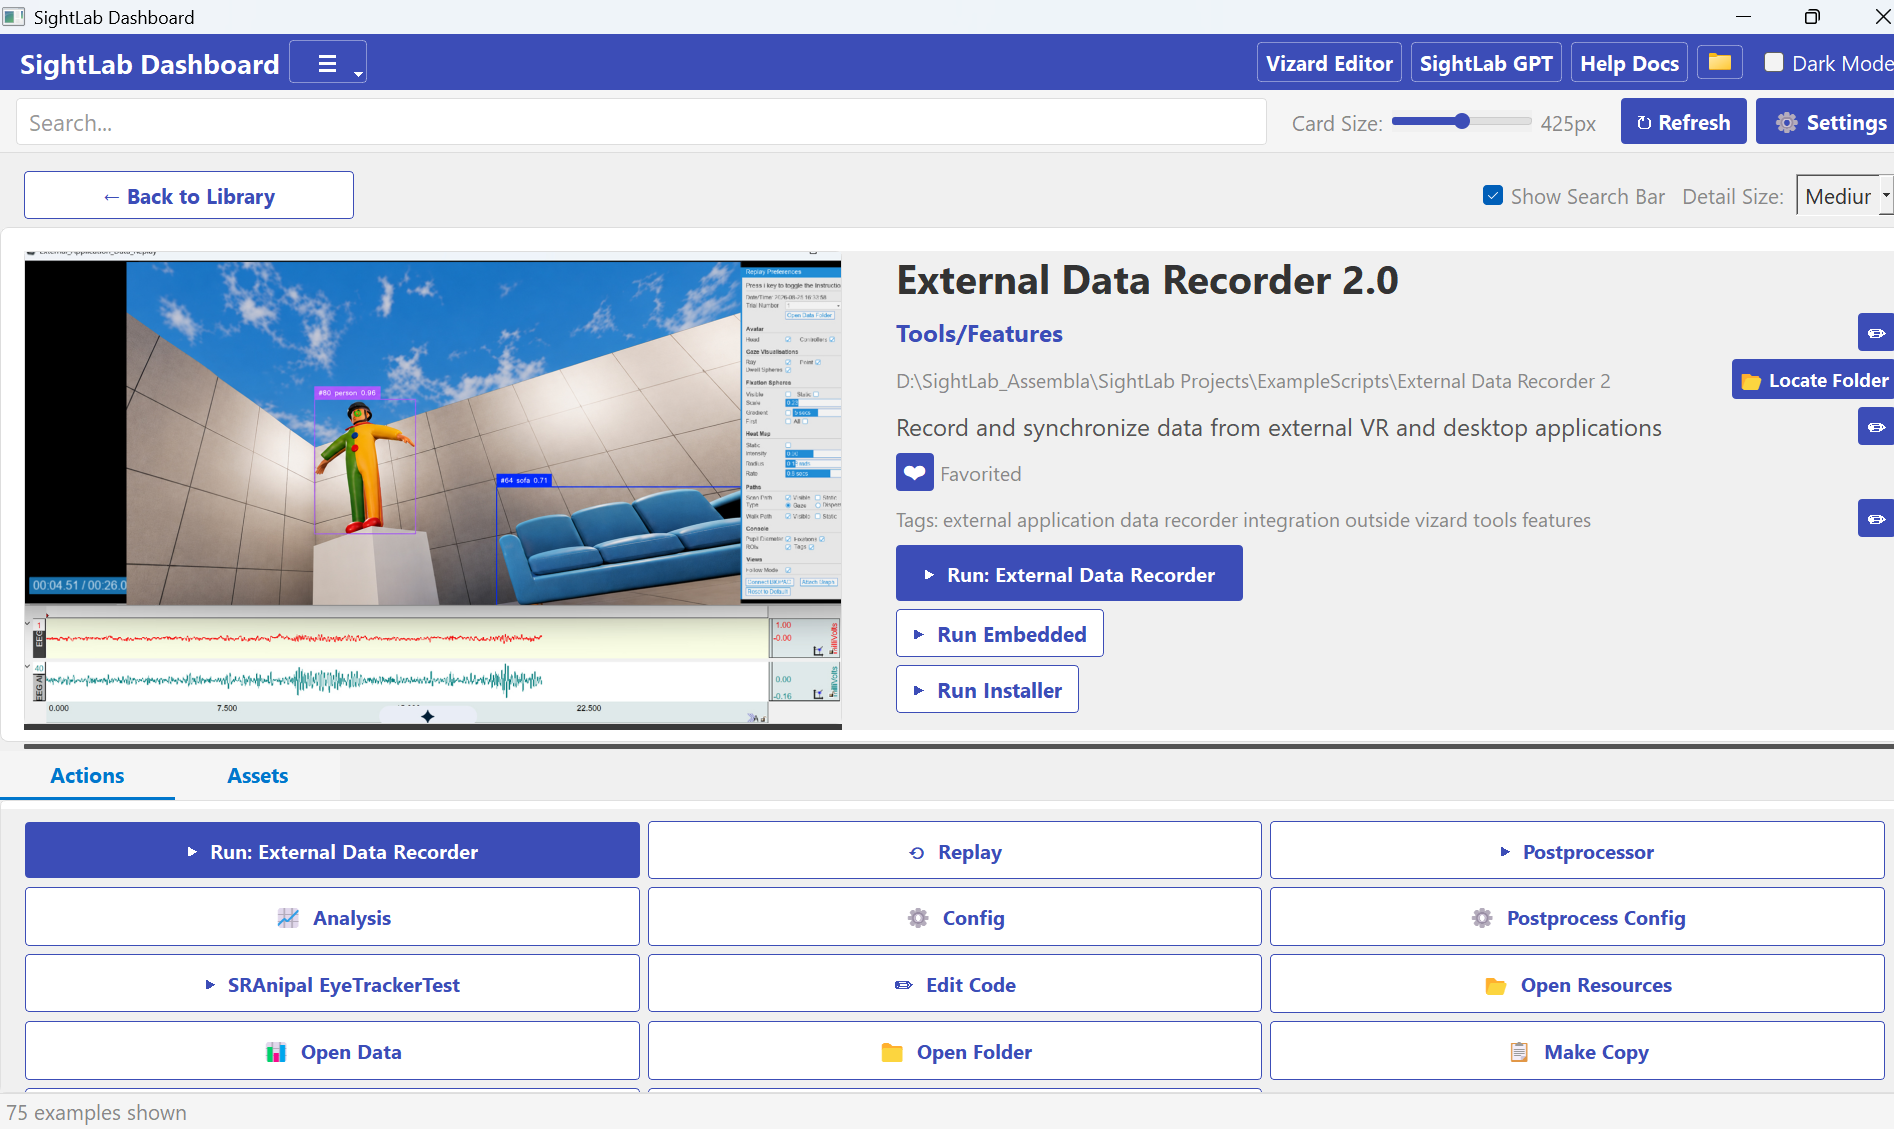
You can start most of the scripts you'll use from the SightLab Dashboard. Go to Tools/Features > External Data Recorder 2.0 and use the buttons on the Actions tab. You can also open any script in Vizard and click the green run arrow.
Scripts you run
| Script | What it does | Dashboard button |
|---|---|---|
External_Data_Recorder.py |
Records a session. Calibration and postprocessing run automatically. | Run: External Data Recorder |
External_Data_Replay.py |
Replays a session, with the gaze point and detected objects drawn on the video (see Session Replay) | Replay |
Postprocessor.py |
Runs postprocessing again on a session you already recorded, for example after changing the detection settings. First set EXPERIMENT_ID and CALIBRATION_ID in Postprocess_Config.py (see the Postprocessing Guide). |
Postprocessor |
Eye_Calibration.py |
Runs eye calibration on its own, without recording a session. It asks for the mirror window and your hardware, and saves <date>_standalone_eye_calibration.json in calibration_data. To postprocess a session with this calibration, set CALIBRATION_ID to the file name without _eye_calibration.json, for example 09-29-2026-10-57-35_standalone. |
None; open it in Vizard |
Settings files
| File | What it controls | Dashboard button |
|---|---|---|
Data_Recorder_Config.py |
Recording, hardware, eye calibration, Biopac, network events, LSL, and replay settings | Config |
Postprocess_Config.py |
Object detection, dwell measurement, overlays, and which session Postprocessor.py processes |
Postprocess Config |
See Configuration for the settings in each file.
Setup and troubleshooting
| File | What it does |
|---|---|
installer/External_Data_Recorder_Installer.exe |
Run once to install the Python packages and OBS Studio, and to turn on the OBS WebSocket server (see Installer). In the Dashboard, click Run Installer at the top of the page, under Run Embedded. |
SRAnipal_EyeTrackerTest.py |
For the Vive Focus Vision, Focus 3, and Pro Eye, which use the SRanipal eye tracking driver. It checks that SRanipal is working: a green gaze ball follows your eyes in a white room. SRanipal sometimes needs this script to start it, so run it if the recorder isn't getting eye tracking data. Close it before you start the recorder. In the Dashboard, click SRAnipal EyeTrackerTest. |
Pimax_Gaze_Probe.py |
Checks that Pimax Dream Air eye tracking data is reaching the PC |
Steamlink_Gaze.py |
Shows live eye tracking data from Steam Link, to check the SteamVR OSC settings (see Steam Link) |
The other .py files in the folder are used by these scripts, and you don't need to run them.
Other Dashboard buttons
| Button | What it does |
|---|---|
| Analysis | Makes charts from a data file. Choose Generate Visualizations and select an obj_det_summary_trial_<n>.csv file to get charts such as a bar chart of dwell time on each detected object. The charts are saved in a Charts folder next to the CSV file. This uses the AI provider set in the Dashboard's Settings, with the data source set to a single session. See Analysis Scripts. |
| Edit Code | Opens External_Data_Recorder.py in the Vizard editor. Right-click it to open one of the other scripts. |
| Open Data | Opens the data folder |
| Open Resources | Opens the resources folder |
| Open Folder | Opens the External Data Recorder folder |
| Make Copy | Copies the External Data Recorder folder to another location |
| Documentation | Opens this page |
See SightLab Dashboard for more about the Dashboard.
AI Object Detection
Postprocessing uses computer vision models, deep neural networks trained to recognize objects, to scan every frame of the session recording. The detector draws a box around each object it finds, gives each object an ID that follows it from frame to frame (for example #44 clock), checks which box the gaze point falls in, and records dwell time and fixations on each object and each class of object.
Two detection models are available:
| RT-DETRv2 (default) | OmDet-Turbo (open vocabulary) | |
|---|---|---|
| What it detects | The 80 COCO classes | Whatever you describe in words |
| Speed | ~60 FPS * | ~20-30 FPS * |
| Use it when | Your scene contains everyday objects such as people, vehicles, furniture, bottles, or screens | You need specific objects, such as "coffee mug" or "yellow car", or objects that aren't COCO classes |
- Tests ran at full floating point precision on an NVIDIA® GeForce RTX™ 5060
RT-DETR (Real-Time DEtection TRansformer) is a fast, transformer-based object detector. The version used here, RT-DETRv2, is trained on COCO.
COCO (Common Objects in Context) is a widely used image dataset with 80 classes of everyday objects, such as person, bicycle, car, bus, traffic light, chair, couch, bed, dining table, bottle, cup, laptop, TV, cell phone, book, and clock. A model trained on COCO can only label objects as one of those 80 classes. If you know some classes can't appear in your scene, list them in BANNED_CLASSES so objects aren't mislabeled as them.
Open-vocabulary detection isn't limited to a fixed list. You write the classes you want as plain phrases, and the model finds only those. You can also give it a natural-language instruction (note: this is set in the Postprocess_Config.py file in the main project folder:
# Postprocess_Config.py
USE_OBJECT_DETECTION = True
USE_OVD = True
OVD_CLASSES = ["coffee mug", "yellow car", "computer monitor"]
OVD_TASK = "Detect anything that looks like a coffee mug, a yellow car, or a computer monitor."
How gaze is matched to objects
- By default, each box is padded by the eye tracker's measured accuracy from validation (
USE_ANGULAR_THRESHOLD), so small gaze errors still count as looking at the object. - If the gaze point isn't in any box, the nearest "near miss" within that accuracy margin is used (
CLOSEST_EDGE). - A dwell starts once gaze stays on an object for
DWELL_THRESHOLDseconds (0.5 by default), and short dropouts of up toDWELL_GRACE_Sdon't break it.
Tips
- Object detection needs a CUDA-capable graphics card with a matching PyTorch build.
- Close VRAM-heavy programs (SteamVR, Unreal, Unity) before postprocessing, or set
USE_FP16 = True, to speed it up (note: setting USE_FP16 = True may degrade the quality of inference by nature of less precision, but in our testing it was not noticeable). - Try different models and thresholds on a recorded session by running
Postprocessor.pyon its own. See the Postprocessing Guide for all settings.
Session Replay
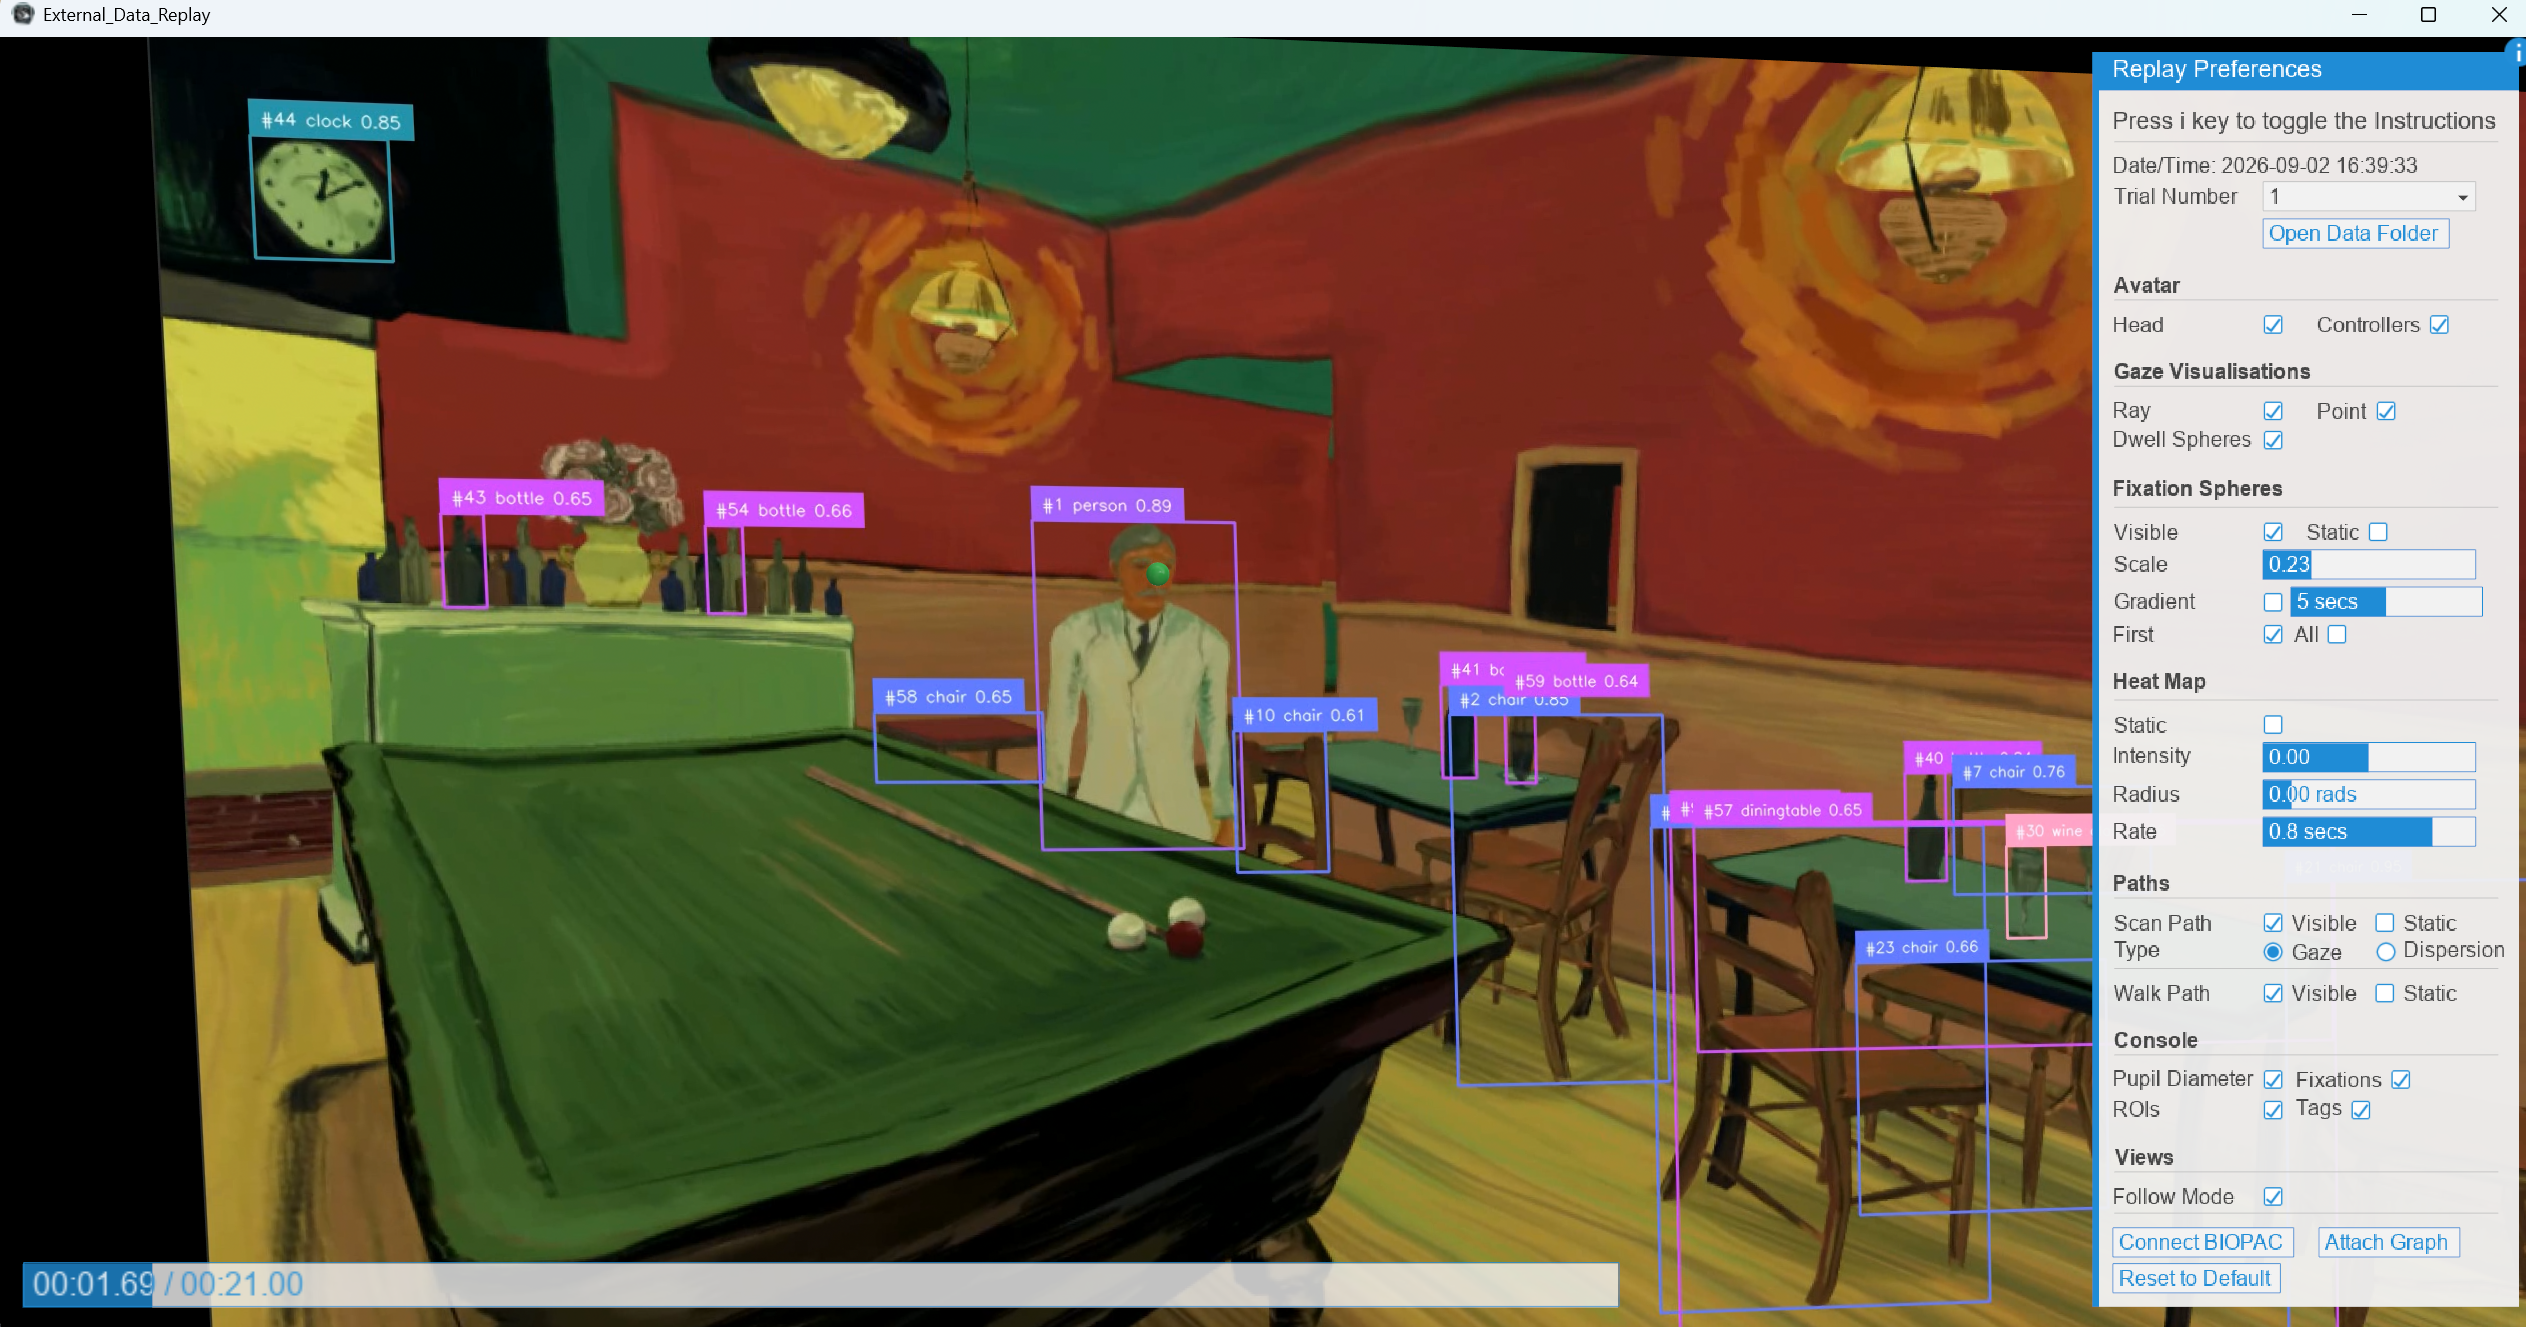
- Click Replay in the SightLab Dashboard, or run
External_Data_Replay.py. - Choose the session. Sessions are named by the date and time they were recorded and the participant ID.
- Choose the calibration file. Select Same as video if you calibrated in the same session; otherwise, find the calibration you reused in the list.
- Choose the video: the overlay video shows detected objects and the gaze point, and the transcoded video has no overlays (although when brought into the replay, the SightLab gaze point is an overlay that can always be toggled).
- Make the
External_Data_Replaywindow full screen.
In the replay you can:
- Scrub: drag the slider, or step with B/N or C/V.
- Follow the participant's view: first-person view is on by default (
FOLLOW_ON). - Sync with AcqKnowledge: when AcqKnowledge is connected, scrubbing the replay moves AcqKnowledge to the same time (see Synchronizing Session Replay with AcqKnowledge).
See Session Replay for all replay features and controls.
What Gets Recorded
Every file from a session starts with the session ID, <date>-<time>_<participant ID> (for example 09-26-2026-09-32-04_0), so files from the same session are easy to match. <n> is the trial number. For every column in every file, see the Data Files Reference.
Gaze and object data
| File | What it contains |
|---|---|
obj_det_summary_trial_<n>.csv |
One row per object looked at: total and mean dwell time, number of dwells, time spent in fixations and saccades on the object, and when it was first looked at |
class_det_summary_trial_<n>.csv |
The same measures per class of object, such as all chairs together |
obj_det_timeline_trial_<n>.csv |
One row per video frame: the object being looked at, dwell flags, the gaze point in pixels, and every detected object with its box and confidence |
overlay_trial_<n>.avi |
The recording with the detected objects and the gaze point drawn on it |
trial_data_<n>.csv |
One row per sample: each eye's gaze direction, fixation or saccade status, gaze velocity, eye openness and pupil size on supported headsets, sync events, and Lab Streaming Layer data |
trial_timeline_fixation_saccade_<n>.csv |
One row per fixation or saccade, with its timing, duration, dispersion, amplitude, and velocity |
eye_calibration_trial_1.json |
The eye tracker calibration and its measured accuracy, in degrees. Eye tracking is done once for the whole session and reused across trials, so there is no |
The object detection files are written by postprocessing when object detection is on. The CSV files are in data/<id>_experiment_data/trial_data/, the videos in recordings/, and the calibration in calibration_data/.
Where to find gaze data
- Gaze on objects: the object and class detection summaries for totals, and the object detection timeline frame by frame
- Where the participant looked on screen:
Gaze Screen X PositionandGaze Screen Y Positionin the object detection timeline, in pixels of the video - Fixations and saccades: the fixation and saccade timeline, and the
fixation statuscolumn in the trial data. They're calculated from the eye tracker's gaze direction, or the mouse for Desktop. - Eye angles: the
Tracker Right/Left/Both Eye YawandPitchcolumns in the trial data - Matching files by time:
timestamp (secs)in the trial data, the start and end times in the fixation and saccade timeline, andFrame PTS Timestampin the object detection timeline all count seconds from the start of the trial, so you can match rows between them
Optional data
The External Data Recorder can also record any sensor data coming into Vizard that the external application isn't using. The external application usually only uses the headset's head and hand tracking, so you can add:
- Physiological data with BIOPAC, such as electrodermal activity (EDA), heart rate, EEG, and fNIRS, and EEG or fNIRS systems connected through Lab Streaming Layer, Cobi Modern, or MedelOpt
- Rating scales, surveys, and demographics
- Audio recording, transcription, and speech recognition
- Face tracking on supported headsets, such as the Meta Quest Pro or Vive Focus Vision
These workflows haven't been fully tested with the External Data Recorder, so results may vary. See Optional Data for what each one saves and how to add it, and Common Metrics for everything SightLab can collect.
All files
External Data Recorder/
├── data/
│   ├── <id>_experiment_data/
│   │   ├── trial_data/
│   │   │   ├── <id>_obj_det_summary_trial_<n>.csv
│   │   │   ├── <id>_class_det_summary_trial_<n>.csv
│   │   │   ├── <id>_obj_det_timeline_trial_<n>.csv
│   │   │   ├── <id>_trial_data_<n>.csv
│   │   │   ├── <id>_trial_timeline_fixation_saccade_<n>.csv
│   │   │   ├── <id>__frame_timestamps_trial_<n>.json
│   │   │   └── <id>_trial_timeline_dwell_<n>.csv
│   │   ├── replay_data/
│   │   │   └── <id>_replay_data_<n>.rply
│   │   ├── config.json
│   │   └── <id>_experiment_summary.csv
│   └── expressions_<YYYYMMDD_HHMMSS>.csv
├── recordings/
│   ├── <id>_overlay_trial_<n>.avi
│   ├── <id>_transcoded_trial_<n>.avi
│   └── <id>_experiment_data_trial_<n>.avi
├── calibration_data/
│   ├── <id>_eye_calibration_trial_1.json
│   └── <id>_eye_calibration_trial_1_postvalidation.json
└── logs/
    └── <id>_logfile.txt
Besides the files above:
| File | What it contains |
|---|---|
transcoded_trial_<n>.avi |
The recording converted for the replay, without overlays. The overlay and transcoded videos can both be used in the replay. |
experiment_data_trial_<n>.avi |
The original OBS recording |
eye_calibration_trial_1_postvalidation.json |
The optional end-of-session validation, which checks how much accuracy drifted during the session |
config.json |
The hardware configuration and recorded window you chose, and the fixation thresholds |
replay_data_<n>.rply |
SightLab's replay file, used by the replay and by postprocessing |
_frame_timestamps_trial_<n>.json |
The time of each frame in the recording, used by postprocessing |
logfile.txt |
The session's console output, saved when you close the recorder |
expressions_<YYYYMMDD_HHMMSS>.csv |
Facial expression weights, when RECORD_FACE_TRACKER_DATA = True |
Data that doesn't apply to external applications
The External Data Recorder also writes SightLab's standard data files. Some of that data measures SightLab's own 3D scene and regions of interest, which external applications don't use:
experiment_summary.csvhas oneENTIRE_SCENErow per trial with no dwell data. Its fixation and saccade measures are valid, but the fixation and saccade timeline has the same information in more detail. If you add rating scales, surveys, or demographic questions, their answers are saved here.trial_timeline_dwell_<n>.csvhas only a header row. Dwell on objects is in the object detection files.- In
trial_data_<n>.csv, SightLab'seye intersect,eye yaw/pitch/roll, andheadcolumns stay constant, andview statusis alwaysNone. ROI/Objectin the fixation and saccade timeline is alwaysNone.
See SightLab Data That Doesn't Apply for details.
Biopac Integration
With BIOPAC_ON = True in Data_Recorder_Config.py, the recorder connects to AcqKnowledge:
- Acquisition starts with the session recording, and a
video startmarker is inserted when recording begins - Press t (
NETWORK_SYNC_KEY), or send thetriggerPressevent (NETWORK_SYNC_EVENT), to insert async eventmarker at any point - In the replay, scrubbing moves AcqKnowledge to the same time
See Biopac Integration for setting up AcqKnowledge, and Sending Events to Biopac for custom markers.
Lab Streaming Layer
With SAVE_LSL_DATA = True, the recorder connects to the first Lab Streaming Layer stream it finds on the network when a trial starts, and saves each sample and its timestamp to the LSL Data and LSL Timestamp columns of the trial data. If no stream is found, the columns say so. See Lab Streaming Layer for sending data from other devices.
Network Events with External Applications
The External Data Recorder can be controlled from an external application, for example starting the trial when the app sends a signal. It can also send triggers to the app, and exchange other information through network events. External apps send UTF-8 JSON over UDP, such as {"event": "start_trial"} or {"event": "sync"}, to NETWORK_HOST and NETWORK_PORT. See External Data Networking for details and Unity and Unreal examples.
Configuration
The External Data Recorder's settings are in three places:
| File | What it controls | Reference |
|---|---|---|
Data_Recorder_Config.py |
Recording, session control, Biopac, network events, LSL, live preview, replay, and hardware options | The table below |
Data_Recorder_Config.py |
Eye calibration and validation | Eye Calibration Guide |
Postprocess_Config.py |
Object detection, OVD Classes and Tasks (which objects you want to track), dwell measurement, cropping, gaze point adjustment, and overlay drawing | Postprocessing Guide |
Recorder and replay settings (Data_Recorder_Config.py)
| Setting | Default | Description |
|---|---|---|
DEBUG |
True |
Print diagnostic messages to the console |
PID |
True |
Ask for a participant ID and optional name, and save them to the data |
DEFAULT_PARTICIPANT_ID |
"0" |
ID used when the participant ID is left blank |
BIOPAC_ON |
True |
Communicate with Biopac AcqKnowledge |
LOCK_TRANSPORT |
True |
Lock the transport |
NETWORK_SYNC_KEY |
"t" |
Key that sends an event marker to AcqKnowledge |
NETWORK_SYNC_EVENT |
"triggerPress" |
Event that sends an event marker to AcqKnowledge |
USE_NETWORK_EVENT |
False |
Send network events to the external app |
NETWORK_START |
False |
Start session recording with a network event instead of START_END_SESSION_KEY |
NETWORK_HOST |
"localhost" |
IP address of the network host |
NETWORK_PORT |
4950 |
Port on NETWORK_HOST to listen and send on |
NETWORK_START_EVENT_NAME |
"start_trial" |
Value of the event field that starts session recording |
TRIAL_CONDITION |
"A" |
Trial label |
SAVE_LSL_DATA |
True |
Save data from a Lab Streaming Layer stream (see Lab Streaming Layer) |
RECORD_VIDEO |
True |
Record the chosen window with OBS. Required for postprocessing. |
RECORD_FACE_TRACKER_DATA |
False |
Save facial expression data |
AUTO_POSTPROCESS |
True |
Run postprocessing automatically after each trial |
TARGET_FPS |
60 |
Maximum frame rate for the OBS recording |
USE_TIMER |
True |
End the trial with a timer instead of a key press |
USE_TIMER_DROPDOWN |
True |
Show a dropdown to choose the timer length |
DEFAULT_TIMER_LENGTH |
10 |
Default timer length, in seconds |
START_END_SESSION_KEY |
" " |
Key to start and stop the session |
PLAY_END_SOUND |
True |
Play a sound at the end of each trial |
SET_NUMBER_OF_TRIALS |
1 |
Number of trials in the session |
REAL_TIME_STREAMING |
True |
Show a live copy of the chosen window with the gaze point drawn on it. Turned off automatically for Desktop First Person Game, Meta Quest 3 Recorder, and OpenXR Recorder. |
PREVIEW_SCALE |
0.5 |
Size of the live copy, relative to the chosen window |
RECORD_VIDEO_OF_PLAYBACK |
False |
Allow recording the replay as a video with the 4 and 5 keys |
HIDE_REPLAY_GUI |
False |
Hide SightLab's replay GUI |
FOLLOW_ON |
True |
Use the first-person view in the replay |
HARDWARE_CONFIGS |
See Choosing a Hardware Configuration | Maps each hardware option to its vizconnect file |
Additional Features
- Rating/Likert scales and surveys: collect participant feedback before or after the external session, with custom scale labels, saved in the data exports (see Adding a Rating Scale GUI)
- Inputs and demographics: gather participant data, such as age, ID, or gender, before the session starts (see Input Dialogs)
- Labels and conditions: tag sessions with experimental conditions for sorting and analysis
- Flags, network events, and button clicks: log custom triggers, such as key presses or network signals, on the session timeline
- Speech recording: record microphone input for later analysis or transcription (see Audio Recording, Speech Recognition and Transcription)
- Transcriptions: combine microphone recordings with transcription tools to create searchable dialogue data
- Instructions: show instructions on the desktop before launching the external app
- Plotly for data analysis: visualize gaze, movement, and behavioral metrics with the built-in Plotly tools
- Face tracking and expression analysis: capture facial expressions with supported headsets, such as the Meta Quest Pro, when enabled in the config (see Face Tracking)
- Baseline: record a short resting or neutral task before launching the external app to establish baseline physiological readings
- Biofeedback Ball: display a 3D object that responds to physiological data
- Lab Streaming Layer: connect to additional devices (see Lab Streaming Layer)
Tips and Troubleshooting
- Don't minimize the mirror window or the external application window, or calibration and recording won't work. Covering them with other windows is fine.
- Use Alt+Tab to check the console whenever something seems stuck. It shows calibration results, postprocessing progress, and errors, and is saved to the
logsfolder. - Speed up postprocessing by closing SteamVR, Unreal, Unity, Pimax Play, and other RAM- or VRAM-heavy programs after the trial. Task Manager shows which processes use the most.
- Match the runtime to your headset, for example Pimax OpenXR for the Pimax Dream Air.
- Vive eye tracking not working: run
SRAnipal_EyeTrackerTest.pyin the External Data Recorder folder before the session. A green gaze ball should follow your eyes in the headset, and running it can also start the SRanipal driver when the recorder isn't getting eye tracking data (see Scripts and Dashboard Actions). - Red calibration dots aren't found: increase
FOCUS_SIZE, or decreaseRED_MIN_PIXELS, inData_Recorder_Config.py. - Validation keeps failing: a threshold stricter than the headset's own accuracy can't be met, however many times you retry. Typical accuracy is about 0.5–1.1° for the Vive Pro Eye, 1.5° for the Meta Quest Pro, and 1.0° for Varjo; raise
VALIDATION_MAX_MEAN_DEGif needed. - Pimax gaze unavailable: run
Pimax_Gaze_Probe.pyto check the Pimax eye tracking connection. - Steam Link gaze unavailable: run
Steamlink_Gaze.pyto check that eye tracking data is arriving, and see Steam Link. - OBS warning about multiple instances: close the extra OBS instances, which can come from other signed-in Windows users, so the recorder can control the right one.
- PyTorch errors: you may need a different PyTorch build for your graphics card's CUDA version. The recorder was tested with 2.13.0+cu132.
- Face tracking data is saved in the
datafolder, and can be visualized withfacial_expressions_over_time.pyfrom theExampleScripts/Face_Tracking_Datafolder.
Limitations
- Headset applications must be recorded through a mirror window, because eye tracking is calibrated against a window that stays open across applications.
- Depth isn't recorded: all spatial information is two-dimensional.
- Head position and rotation aren't recorded.
Related Documentation
- Eye Calibration Guide, Postprocessing Guide, and Data Files Reference
- Hardware guides: Vive Headsets, Meta Headsets, Meta Standalone Apps, Steam Link, Pimax Dream Air, Desktop and Desktop First Person, Screen Based Eye Trackers
- SightLab Dashboard
- Session Replay
- Biopac Integration
- Lab Streaming Layer
- External Data Networking
Looking for the External Data Recorder 1.0 documentation?
Please see External Application Data Recorder 1.0.